Inspired by a true icon, the R50 MINI is fast becoming a classic in its own right. But how does it stack up as a project car?
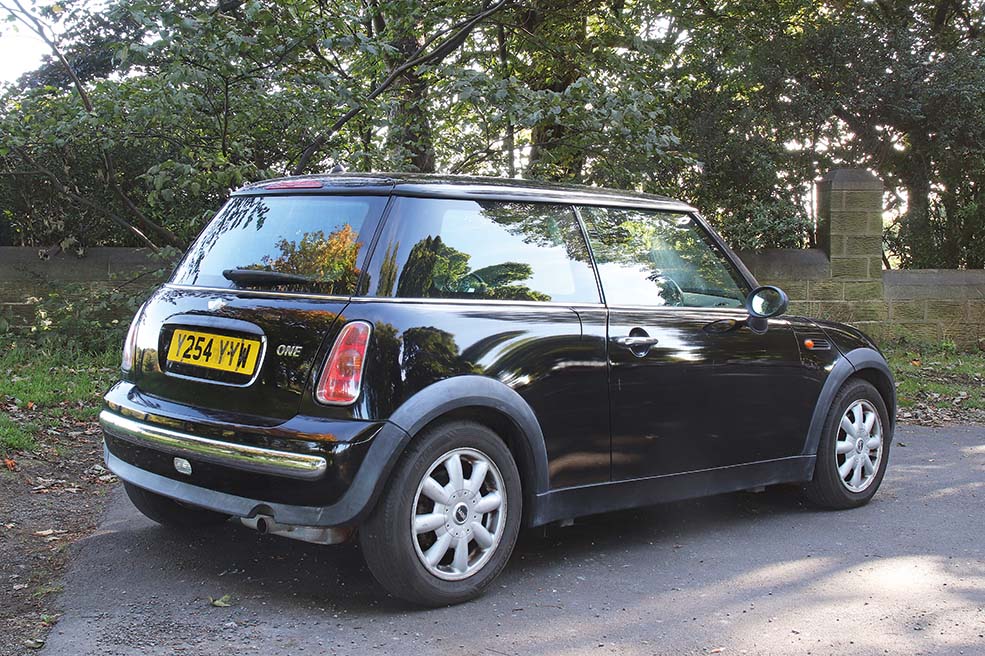
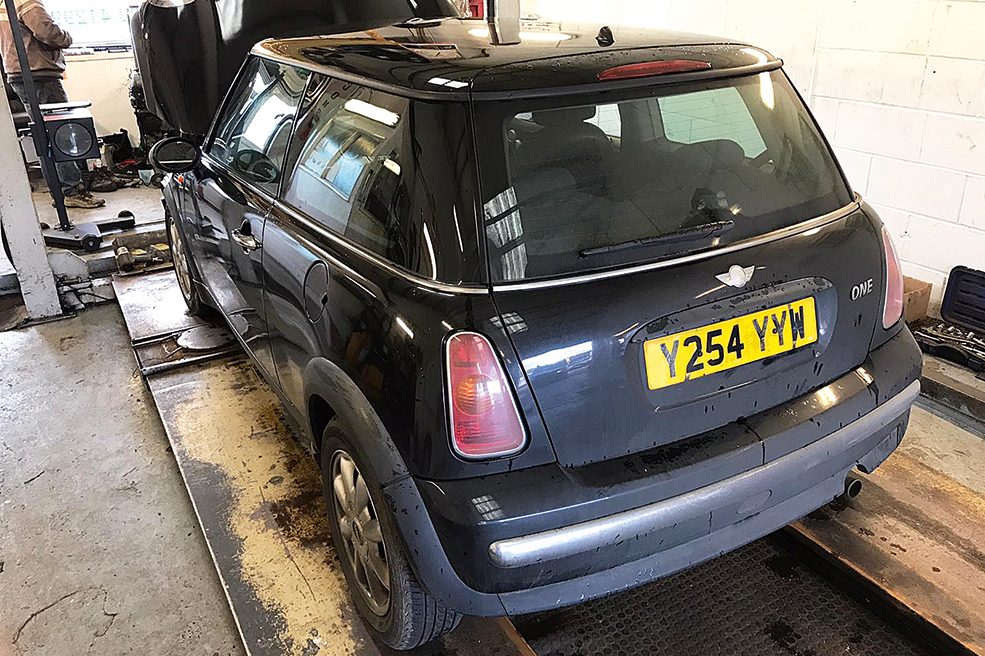
Say hello to our latest project car: a 2000 R50 MINI One. As an early example of the car that took the Mini nameplate into the 21st Century, the R50 MINI is fast becoming a modern classic – and one that’s far cheaper to buy than the car that inspired it.
We’ve taken our R50 MINI on board to see how a cheap early example of BMW’s MINI stacks up as an ownership proposition. Our Y-reg car cost just over £400 at auction in 2020, albeit with an MoT due and some issues to take care of. Here, we’ll chronicle our experiences with our MINI One as the project progresses.
R50 MINI One project: Introduction
The days of buying a cheap classic Mini as a daily runabout are over. Today, many will find it hard to justify spending £5000 on a tatty Mayfair or City model from the 1980s. Occasional bargains can be had, but there is often a catch, such as an abandoned Woody Traveller with no logbook or an imported Moke with promises to have its paperwork intact on purchase. It can be frustrating if you’re looking for a cheap project.
BMW MINIs, meanwhile, are starting to gain in value – and cheap ones available for £500 to £1000 are often snapped up quickly. It’s easy to see the appeal: retro styling, improved crash protection over the old car, and handling that can be considered alongside that of a classic Mini, but with improvements in refinement.
There are mixed opinions on the choice of mechanical components on the BMW MINI, with gearbox and power steering problems being top of the list. Common problems abound, but that spells good news for owners, because someone somewhere knows how to fix them and source parts.
Similarly, some of the problems associated with the classic Mini are non-existent with the BMW version, such as corrosion and rain-sensitive ignition components. Many classic Mini fans have taken a long time to accept the updated BMW, but with the 20th anniversary of production upon us, the R50 MINI has surely earnt its classic car status.
We eventually found our MINI One thanks to Car Mechanics magazine editor Martyn Knowles, who has a collection of these cars, including several 2001 Y-reg models. He knows his way around the UK’s car auctions, where MINIs are often not considered collectible or classic, so when Y254 YYW was spotted at British Car Auctions near Reading, he offered to bid for it live online and won the auction at a bargain £275. Add in the fees, and the total cost tipped £400. The Covid-19 pandemic didn’t make collection easy from BCA near Reading, but luckily, the auctioneers have a transport service and charged a reasonable £330 (inc. VAT) for the convenience.
Delving into the car’s history, we discovered that the MINI has 76,000 miles on the clock, but some 3000 miles ago its radiator and coolant had been replaced, along with the brake fluid, tyres and some air intake components to the tune of £541.20.
A look online at the car’s MoT history revealed a bit of an anomaly, however. During July 2020 when the UK was in lockdown and MoT tests had been extended, the MINI One was submitted for a test and it failed, mainly on rear brake performance, but also on headlight aim and a faulty OSF indicator. However, its MoT extension automatically kicked in, so it was granted a certificate until January the next year: not only was the car road legal, but it could be taxed online.
Sadly, however, those faulty brakes meant we weren’t prepared to head out for a road test. Instead, we spent time looking over our new purchase, making a lengthy to-do list for tackling as the project goes on – all will be revealed soon.
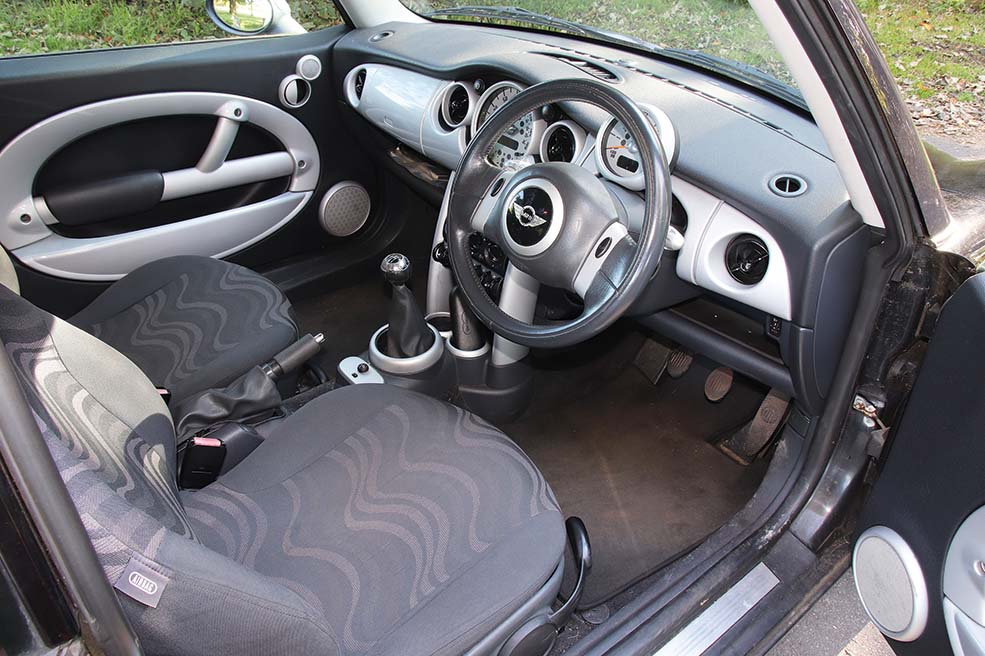
During the assessment we also checked to see if this MINI One has the hallmarks of an early model. The most collectible MINIs have the Y-registration ending with the letters ‘OBL’, so our car is never going to be in that league. Instead, it has a build date of May 2001 and is car number 276 according to its VIN.
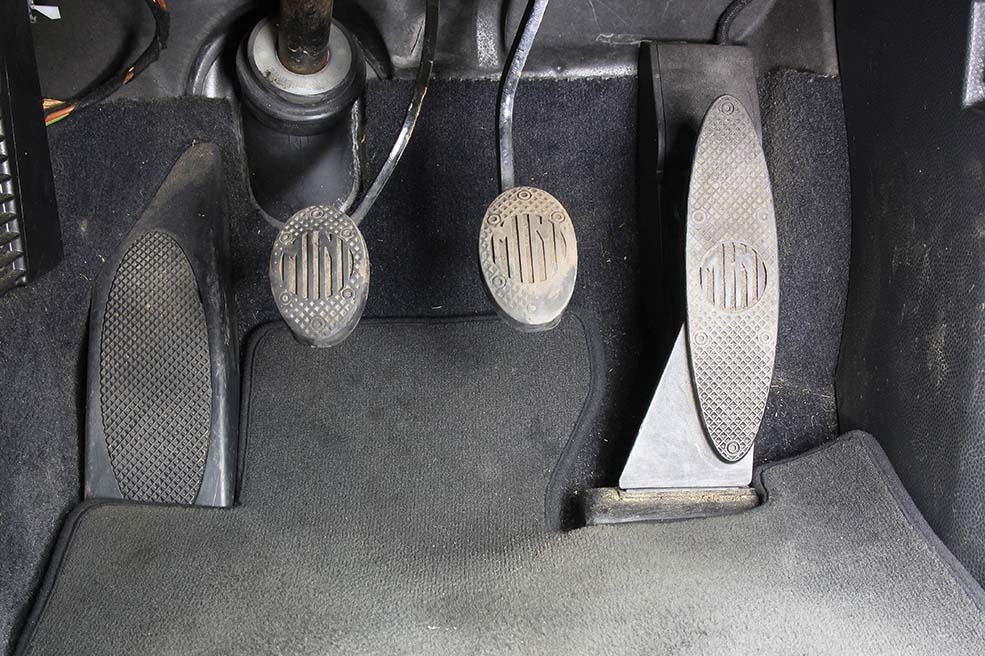
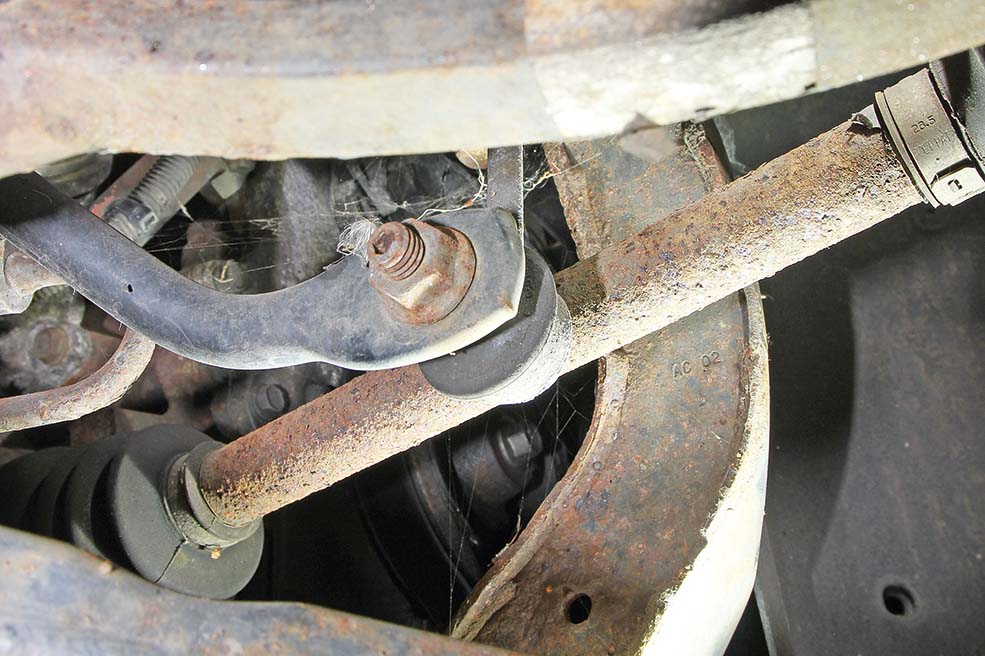
Our car does bear a few early features, such as the ‘MINI’ embossed pedal rubbers (above) – later pedal rubbers don’t have these logos. The windscreen washer jets are smaller on the early R50 MINIs, and there should be foam underneath the scuttle panel grilles, but this is missing. Looking underneath the front end, the anti-roll bar droplinks are a later type (see gallery below), suggesting the front MacPherson struts have been changed – early struts are expensive to replace, with top bearings and bushes costing around £200 a set.
There was a time when a 1959 Mini wasn’t worth its weight in scrap; superseded by later models with a rod-shift gear change, disc brakes up front and a larger A-series engine, the car was considered less desirable. This MINI One may not be following suit in terms of technological advancement, but it seems destined to be just as collectible due to its emerging-classic status. We’re determined to preserve it as much as possible and keep it looking original.
Assessment
The rose-tinted glasses are definitely off, but we’re optimistic our 2001 Y-reg MINI One isn’t going to turn into a bottomless money pit. Being an early model, we plan to keep it as original as possible, which may mean overhauling some parts instead of replacing them, but that may not always be feasible.
The defective rear brakes that were noted at the last MoT test in July 2020 may have been caused by a sticking brake caliper for instance, but hopefully we can overhaul the caliper with new seals, helping to keep the original BMW component. From a point of being frugal, the rear brake discs are rusty, but they are not worn excessively, so we will remove and clean them to see if they can be restored. A replacement set of discs and pads only costs around £60 to £80, so all is not lost if the budget method fails.
There are a number of minor irritations with our MINI One. For example, the passenger door electric window doesn’t work. The motor on our car attempts to power into action when the switch is pressed, but nothing happens. According to several forums, owners and specialists, thumping the door panel, just above the speaker, can fix the problem and stir the motor to life. We’ll remove the door card, check the electrical connections and grease the runners instead of simply hitting something, however.
The steering on our example feels very agricultural and clunky. The MINI’s steering is a combination of hydraulic and electric assistance – there’s an electric pump instead of a belt-driven pump, which then feeds the hydraulic power steering fluid through to the steering rack to provide powered assistance. Typical of an old design, the steering isn’t particularly light, but there are also a few knocks and bangs when manoeuvring the car.
We checked the fluid level inside the power steering reservoir and it’s up to the maximum point on the dipstick, but worryingly ours is a murky brown colour. The fluid should be Pentosin CHF 11S, which is usually green. We checked with our local MINI specialist, mad4mini, and they explained the power steering fluid shouldn’t usually need renewing – although it may have been incorrectly mixed with Dexron II, which is recommended for the later MINIs. A refresh of the fluid, lubrication of the steering column linkage and a check over of suspension bushes may discover the cause of the notchy and seemingly not so good steering.
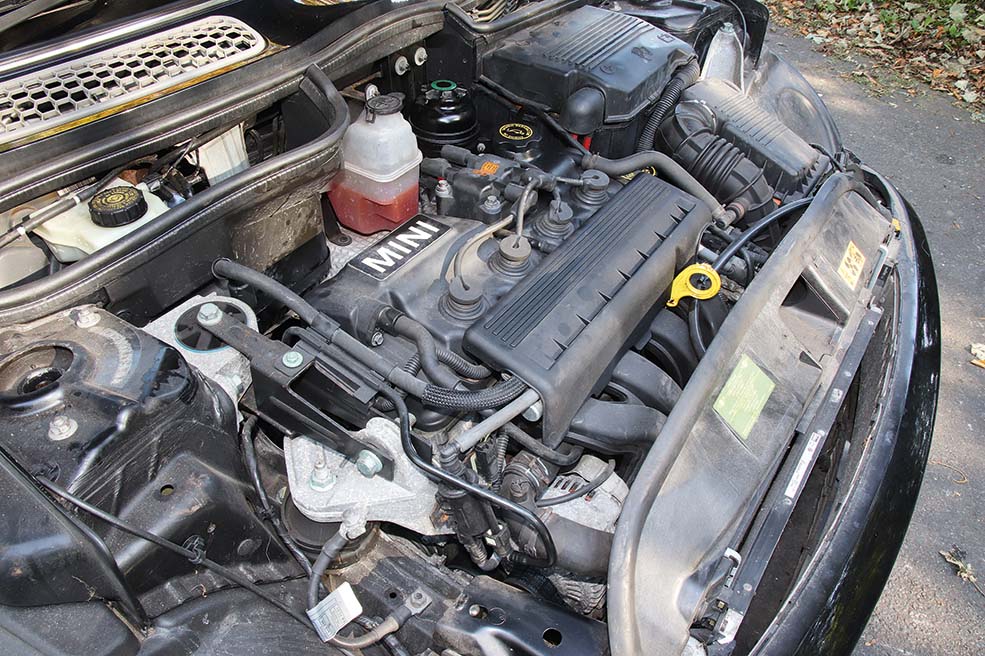
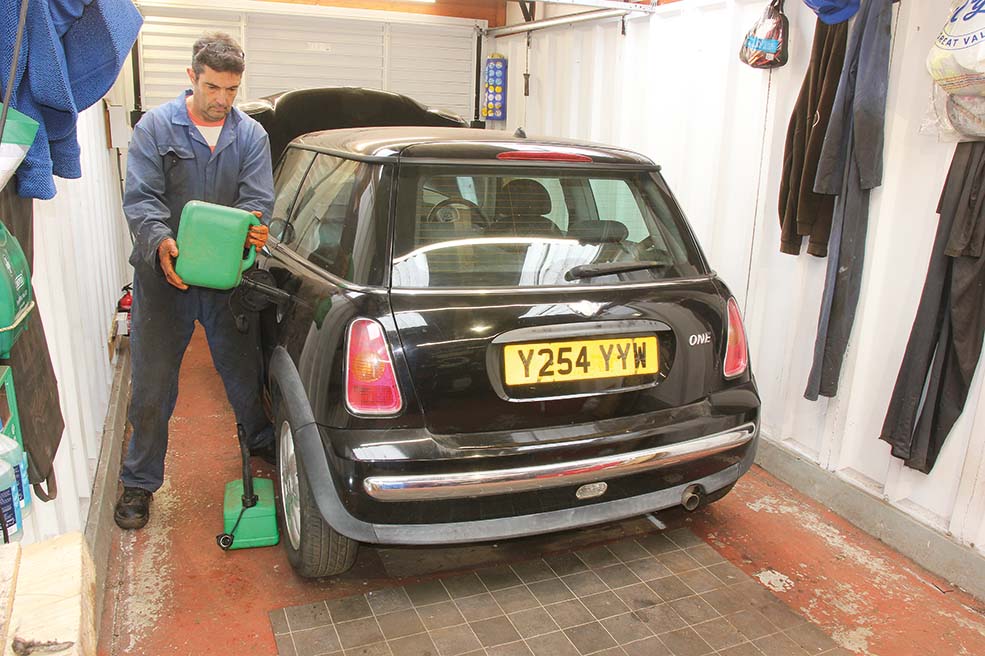
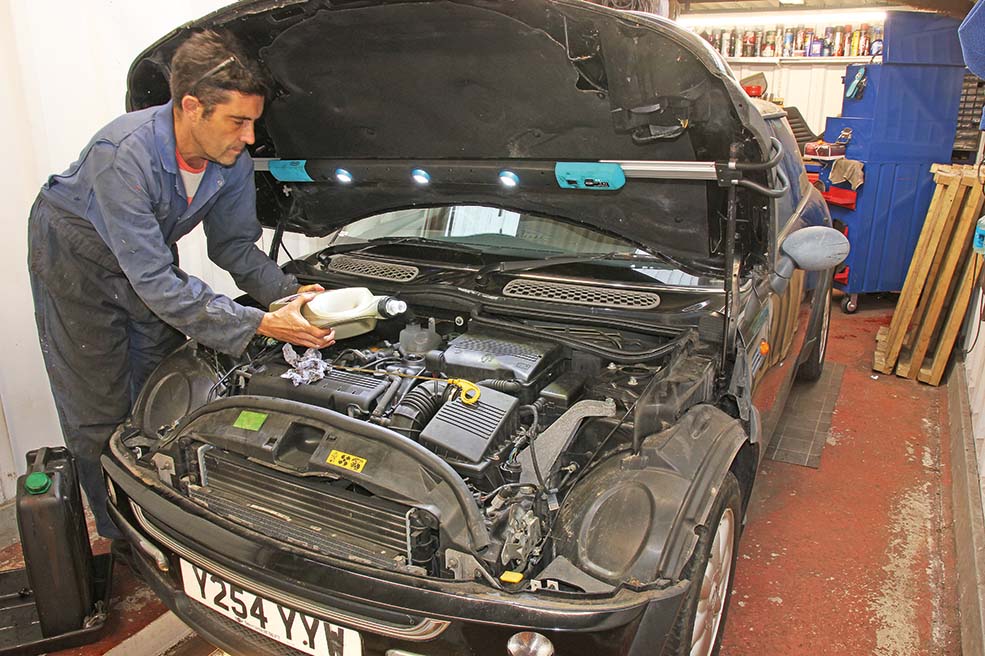
Whilst the fluid in the power steering reservoir may look a little dubious, at least it’s there, unlike the engine coolant and engine oil. Our car was barely showing any oil on the dipstick after delivery; after adding 1.5 litres of engine oil, the level was between MIN and MAX.
Similarly, there was hardly any coolant inside the expansion tank, which is secured to the engine bulkhead. We topped this up with diluted G12, slightly worried that that the coolant inside the engine may have run out as well – especially if the expansion tank outlet was blocked. We squeezing a number of coolant hoses revealed the sound of liquid being moved, so we ran the engine for several minutes to allow it to warm up and later checked the coolant level. It had dropped by a small amount, so it was topped up again.

Both the coolant and engine oil will need to be monitored to see whether fluid is being lost. However, we’ll be completing an engine service, so the oil will be drained. This led us to wonder when the last service was conducted.
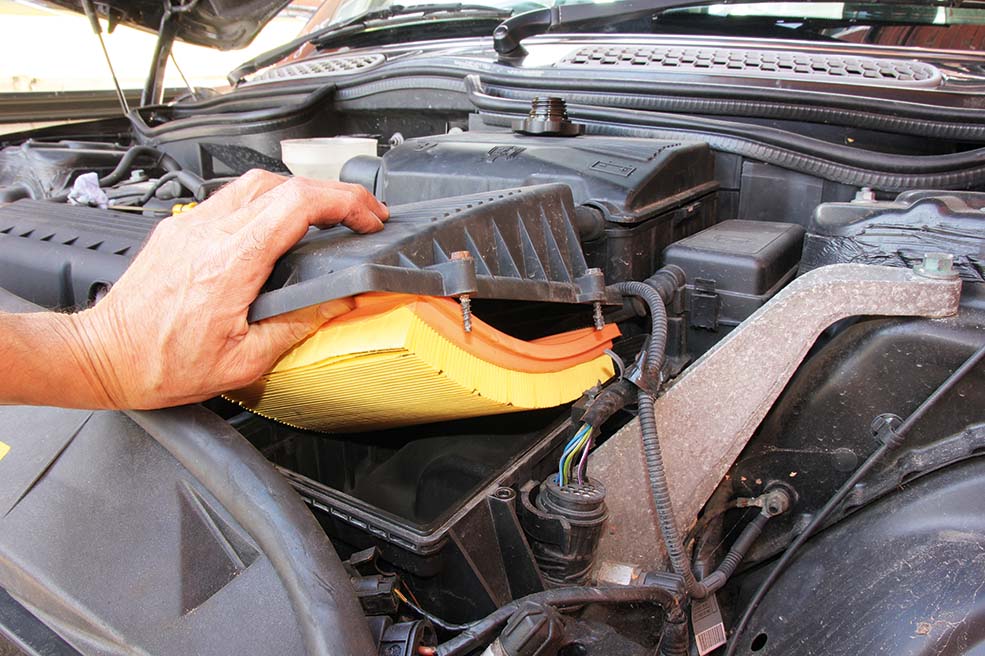
Strangely, the air filter looked as good as new, but the pollen filter looked worse than the inside of a Dyson after several years of abuse and neglect. So while the air filter can survive for a few more miles, new service items need to include engine oil and a filter, a pollen filter and a set of spark plugs to be safe.
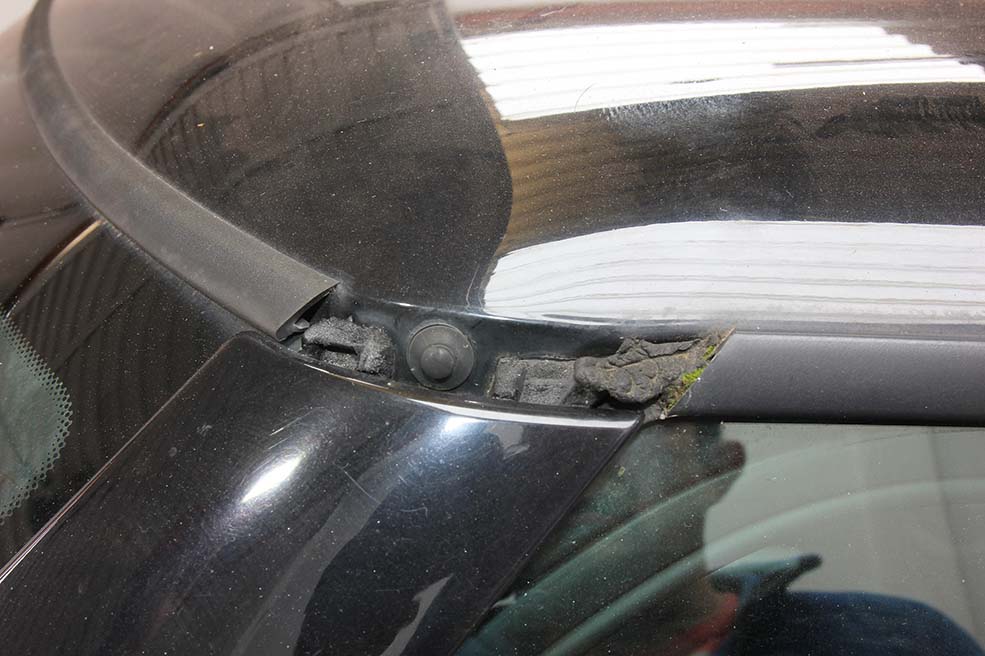
There are a number of exterior cosmetic-related problems that should be fixed on the MINI. Most of the exterior black plastic trim has faded and there’s some trim missing from the nearside front corner of the roof, as well as a missing bee-sting aerial at the back of the roof.
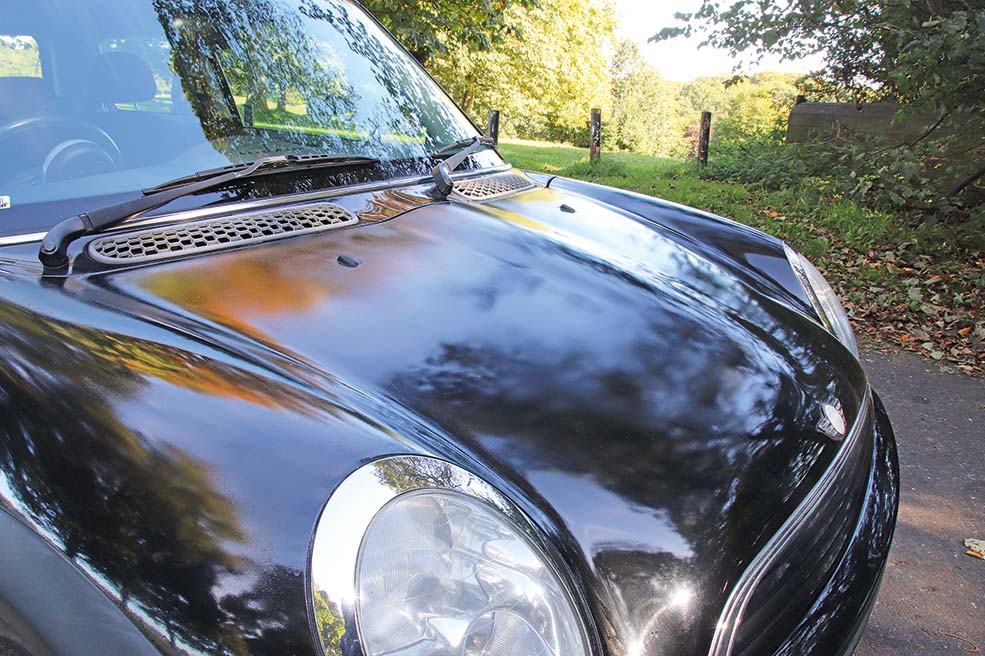
The worst of the cosmetic defects on the outside of this MINI concerns the bonnet. It has a mottled finish and looks as though someone has attempted to respray it, but the paint reacted. It’s beyond a cut and polish, so a respray is the only answer.
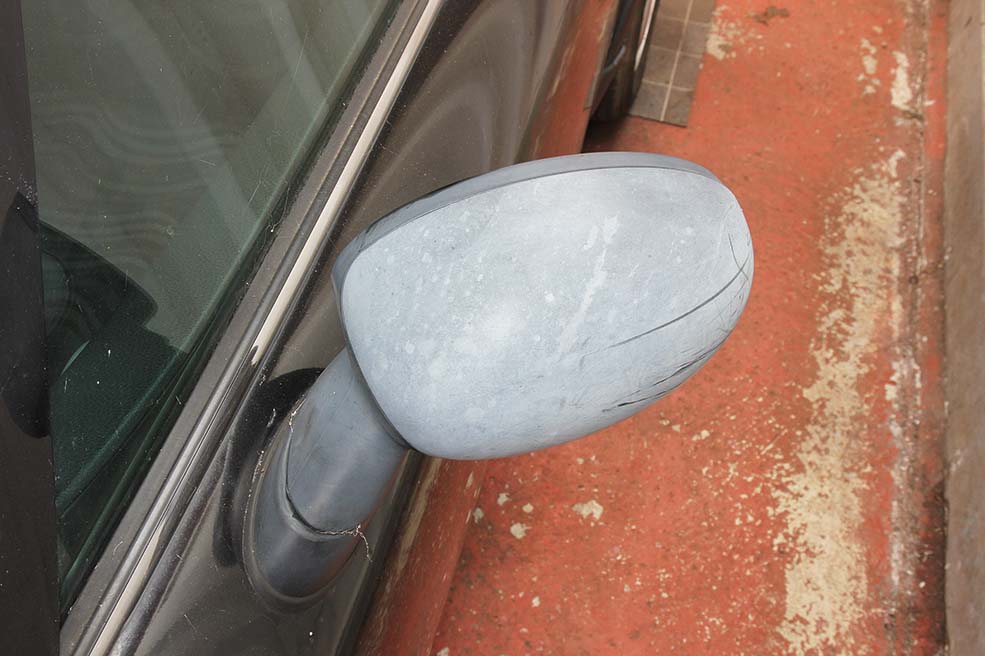
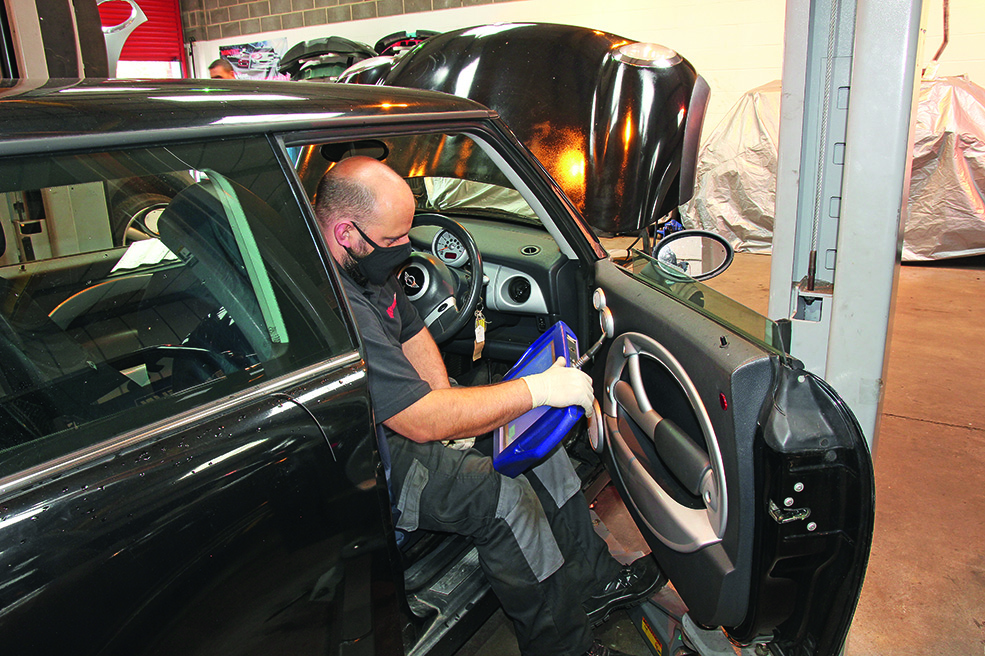
Inside the MINI, there are a few tatty pieces of trim, including the gear knob that cuts into your hand and water marks on the seat, but overall the interior isn’t too bad. The digital display for the steering column-mounted tacho doesn’t work (this displays information such as outside temperature), nor does the aforementioned passenger electric window, but otherwise everything else seems to be in good order, including the electrically adjustable door mirrors. While inside we plugged in a fault code reader, and couldn’t find any stored or pending faults.
The boot tells a different story and highlights a common problem with the MINI – water ingress. There’s no spare wheel or toolkit underneath the false floor, but instead there’s what can be best described as enough water for a foot spa.
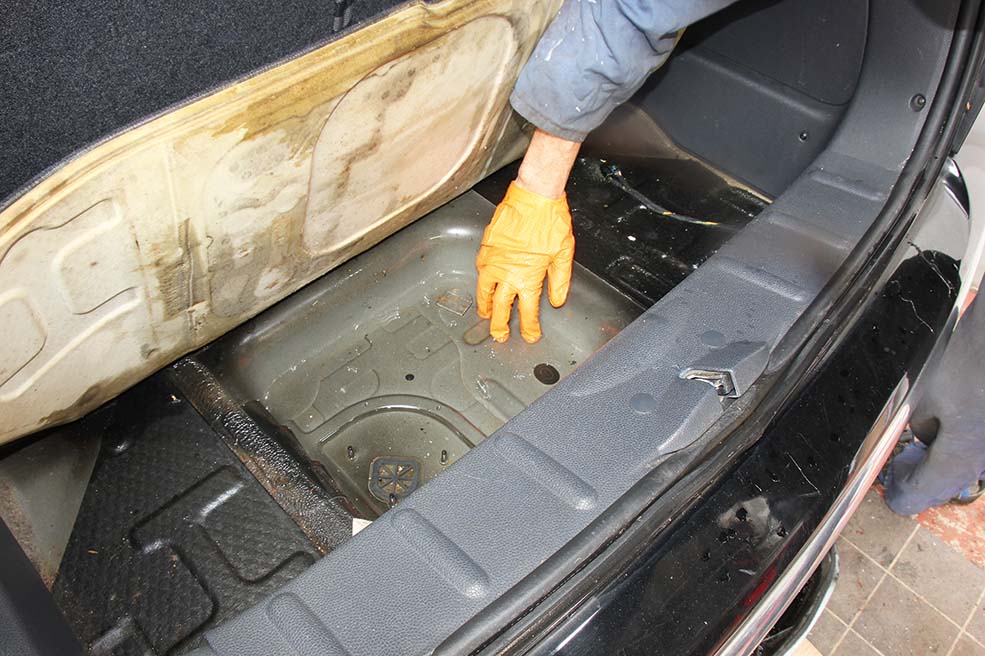
Surprisingly, the water is clean and the surrounding metalwork is free from rust, so all we need to do is drain it and find the source of the leak. Water can leak through via the high-level brake light, the rear wiper, registration-plate lights and plinth, and the tailgate seal. I’ll remove all of them in an attempt to find and fix the problem.
Engine service and headlight issues
It’s often difficult to tell whether a car has actually been looked after, or superficially maintained to look good and tick a box in the service book. In our case, there is no service book but going by looks, the new-looking air filter didn’t tell the full story.
Neither did the fresh coat of grease on the two bonnet-release mechanisms – they can seize, so we’re not ungrateful for them being lubricated. The pollen filter gave the game away as it was absolutely filthy, and it’s bewildering as to why. It’s accessed via the passenger footwell and only requires a selection of crosshead and hexagonal screws to be undone; it’s a little fiddly to fit, but not that difficult.
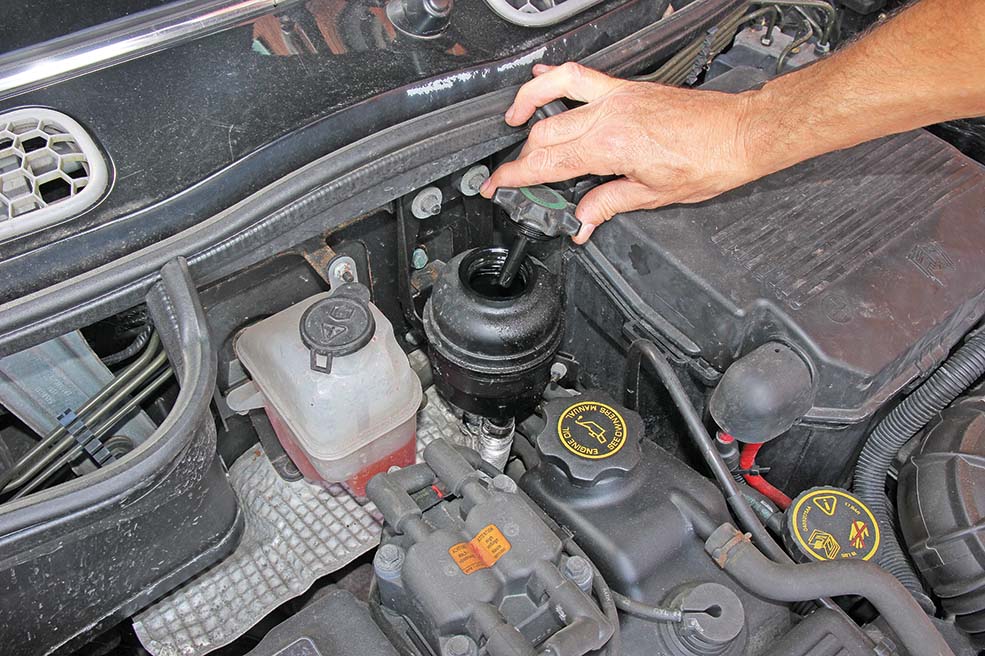
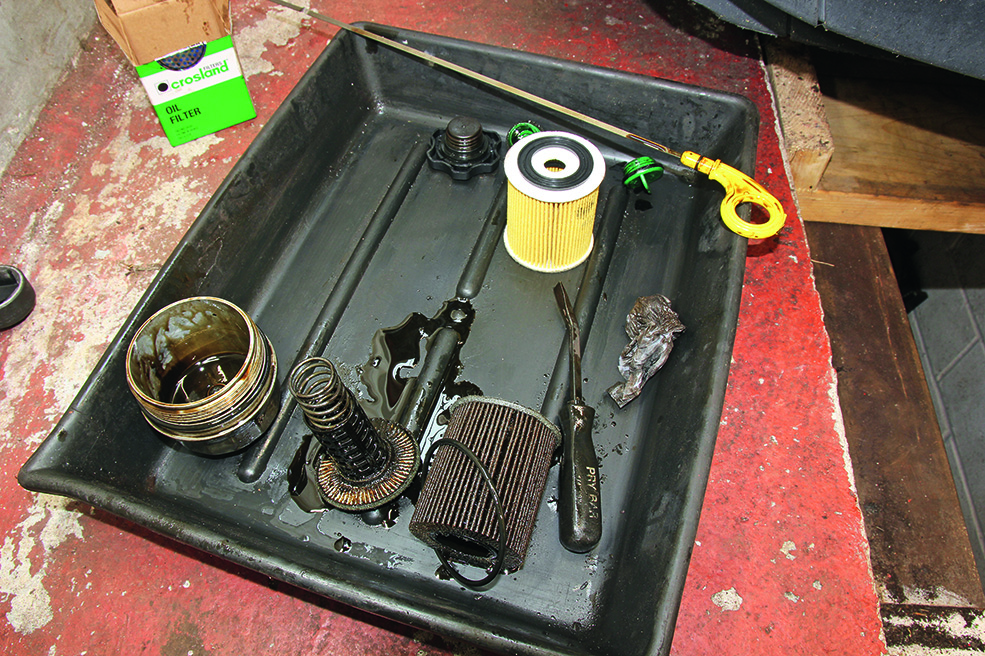
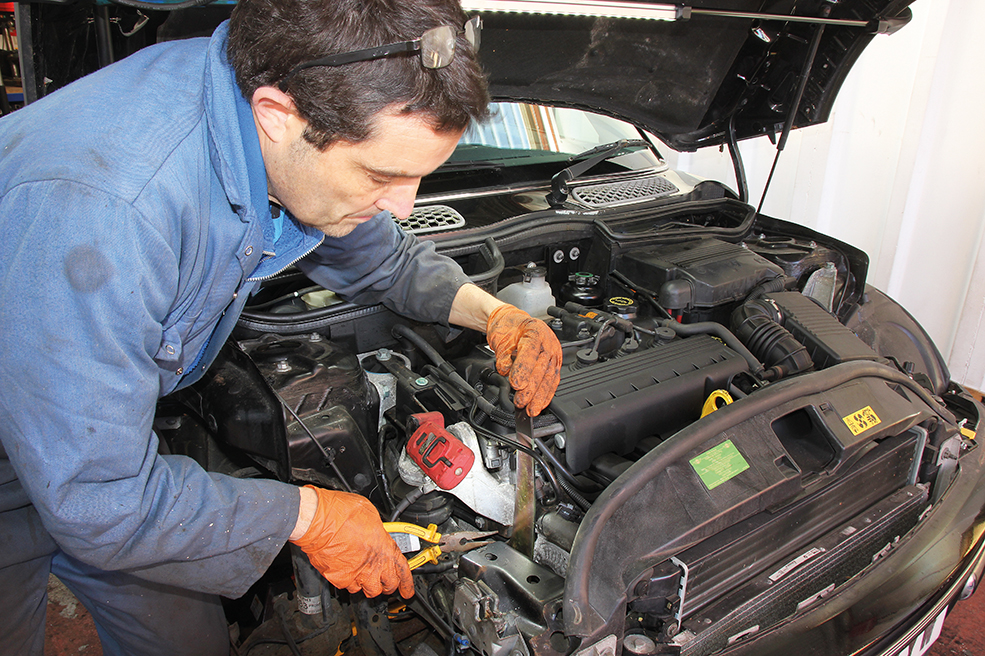
We soon discovered much harder jobs that should have been straightforward. The oil filter had us stumped when we drained the engine oil. We knew the filter is accessed from the top of the engine and is contained inside a canister. Access is a little tight, but using a suitable 36mm socket and an extendable ratchet, we managed to undo and remove it.
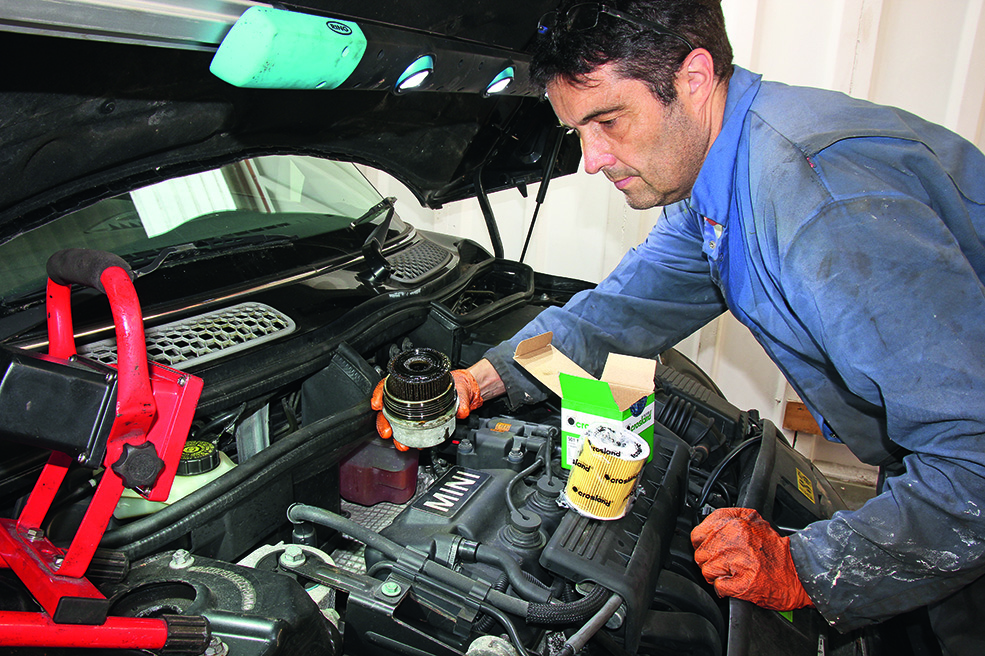
The old filter seemed to be glued to the canister, so it was prised it out; we then discovered a selection of parts including a spring, a honeycomb-shaped insert and some remains of the old filter. We tried to assemble a few of these with the new filter but found one of them couldn’t be fitted. Assuming it was part of the old oil filter, we bagged up the old parts and put them in the bin.
After fitting the new oil filter along with a new drain plug and replenishing the oil, we discovered a few days later that once the engine had been run and had warmed up, the oil pressure warning light appeared on tickover, but disappeared with raised engine revs.
We called MINI specialist mad4mini to see if they had come across this problem – and they have. Once they knew we had changed the oil filter, they asked whether all the components had been refitted. One of these helps to maintain oil pressure on tickover, so we delved into the bin and thanked our lucky stars for fortnightly collections. A visit to mad4mini is on the cards to assemble the oil filter correctly.
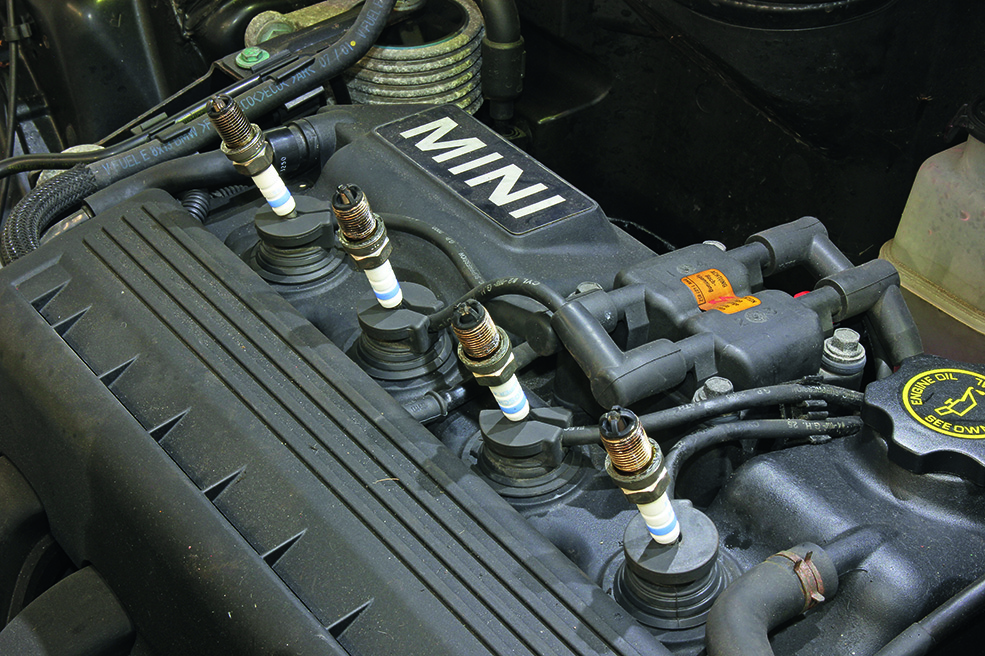
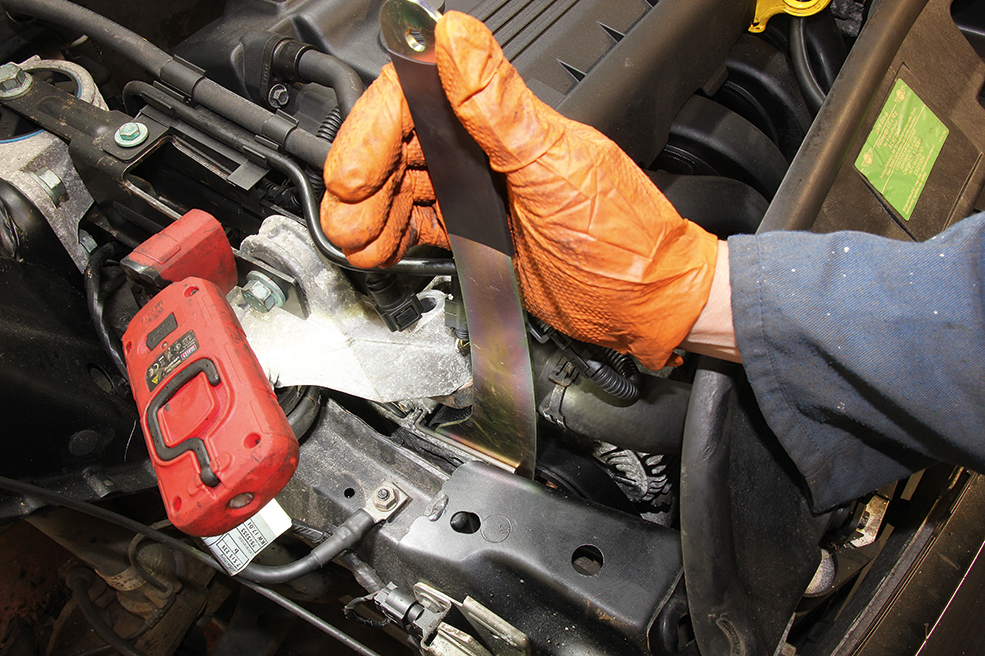
Other potential servicing nightmares concern the spark plugs. These are threaded into the aluminium cylinder head and can seize and strip their threads, especially if they have been overtightened – they are supposed to be tightened to 27Nm. Luckily, each unwound without any trouble and the new ones were just as easy to fit and tighten. If a thread is damaged, it can be repaired in situ with a Heli-Coil kit.
The HT leads are fed a long way down into the top of the camshaft cover, so their ends can easily break off. We carefully tried to prise each one up and avoided pulling on the thinner part of the lead. It helped and none of them broke.
When it came to initially threading a new spark plug into the cylinder head, we realised a spark plug socket would not help because the rubber bung inside would remain stuck on the end of the plug. We’ve been here before on many single- and twin-cam engine, so we used a short length of rubber hose with an 8mm inside diameter to initially fit each spark plug, then tightened with a torque wrench.
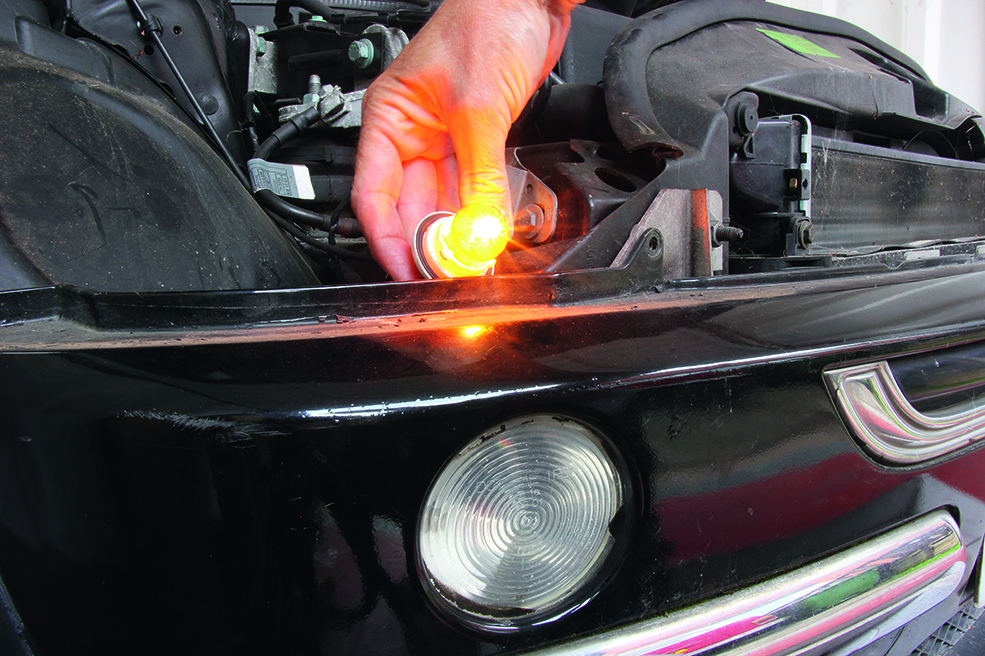
After servicing the engine, we turned our attention to some of the minor points that had failed the MoT test back in July 2020. These included a faulty offside front indicator and the headlight aim being incorrect. Our local MoT testing station will help us with the headlight aim, but we checked all of the adjusters at the back of the headlights, which can be accessed from the underside of the bonnet.
As for the dodgy indicator, this is easy to access with the bonnet raised. We removed the bulb holder, waggled the bulb with the hazard lights switched on and it started to flash. So we extracted the bulb to look for corrosion – there wasn’t any – then we sprayed a little contact cleaner inside the holder.
The offside front bulb is still a little temperamental at times and our action seemed to wake up more gremlins; soon after, the nearside rear indicator bulb failed, and this wasn’t so easy to fix. The rear light unit needs to be extracted from the outside by undoing a single nut from the inside.
Once removed, that’s the easy part and we changed the bulb, but then had to refit the light unit. The long stud for the aforementioned nut wouldn’t locate through a hole while we waggled the light unit into position.
Eventually, after using screwdrivers, the stud went through the hole. We’re dreading the next blown rear bulb: it’s not a job you want to do on the roadside in the dark!
Brake service and caliper seal replacement
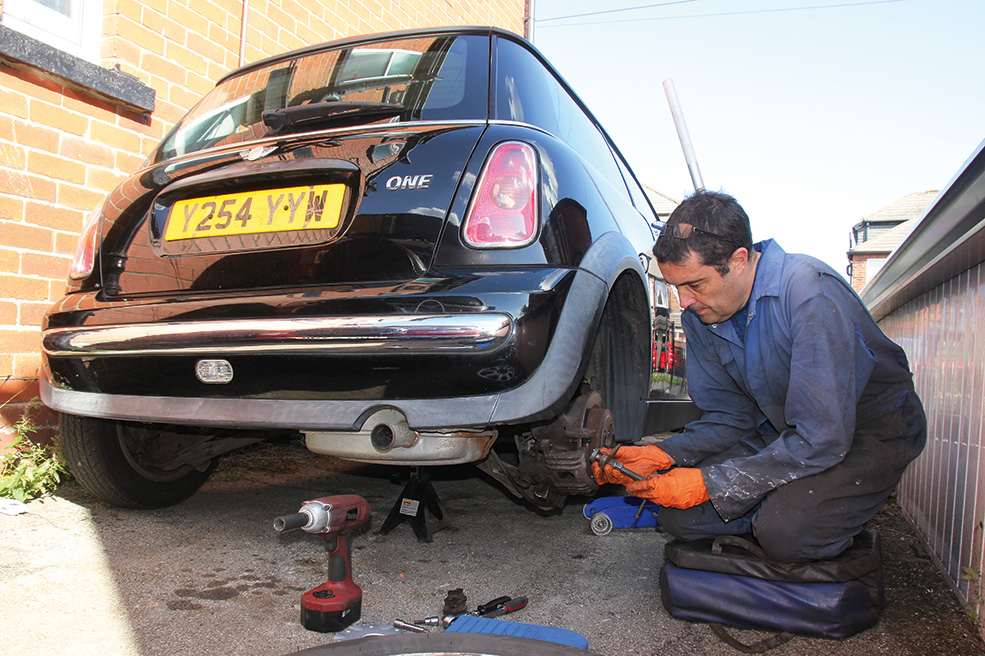
The most worrying aspect of our MINI One’s MoT test in July 2020 was the fact that it failed on the rear brakes, but due to the MoT extension the car could legally continue to be driven on the road. When we discovered this, there was no way the car was going anywhere until we had attended to the brakes.
The front brakes were in good working order but to be safe we still stripped and serviced them, removing the pads and slider bolts to clean them along with the caliper carrier before applying brake grease and reassembling each brake. Typical of many modern cars, the front brakes consist of single-piston calipers with 7mm Allen key upper and lower slider bolts. It’s not only important to ensure the slider bolts are clean and free-moving, but also that the brake pads are able to move against the brake disc and away from it.
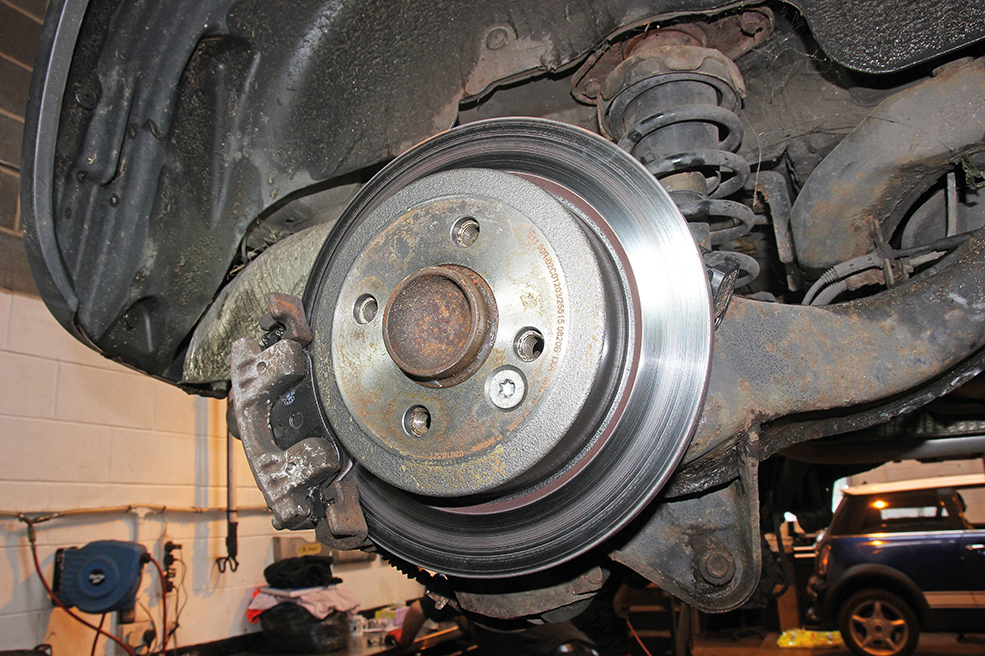
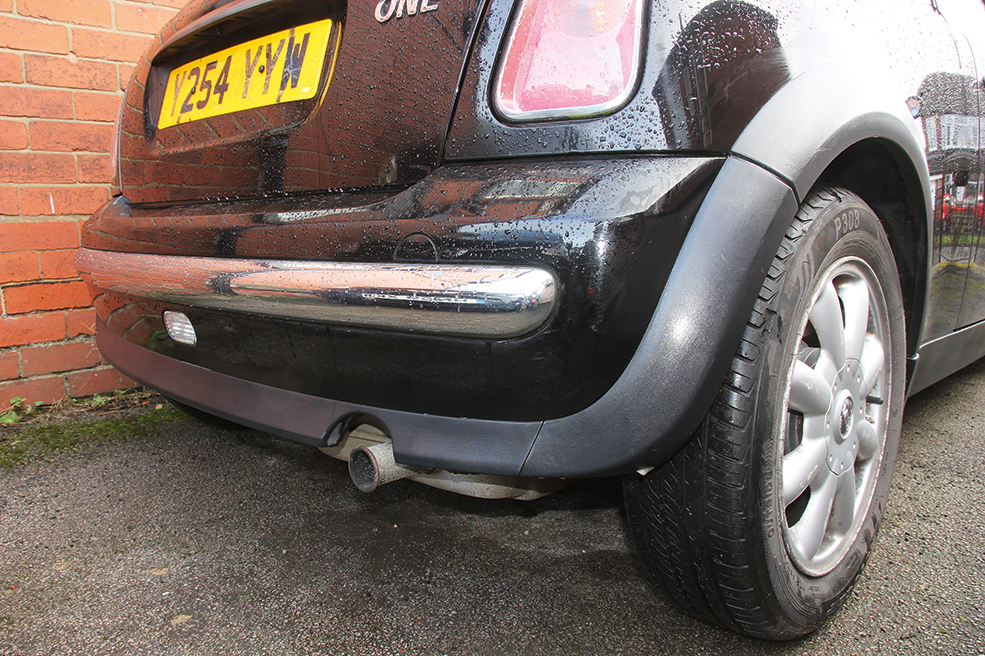
The rear brakes are a similar design to those on the front, with the addition of a mechanical handbrake mechanism to operate the same set of brake pads. The rear discs on this MINI were looking a little rusty, which may suggest why they failed the MoT test, but considering they were hardly worn (along with the pads), we were hopeful we could rescue them by removing the discs and cleaning them up with an angle grinder and flap wheel.
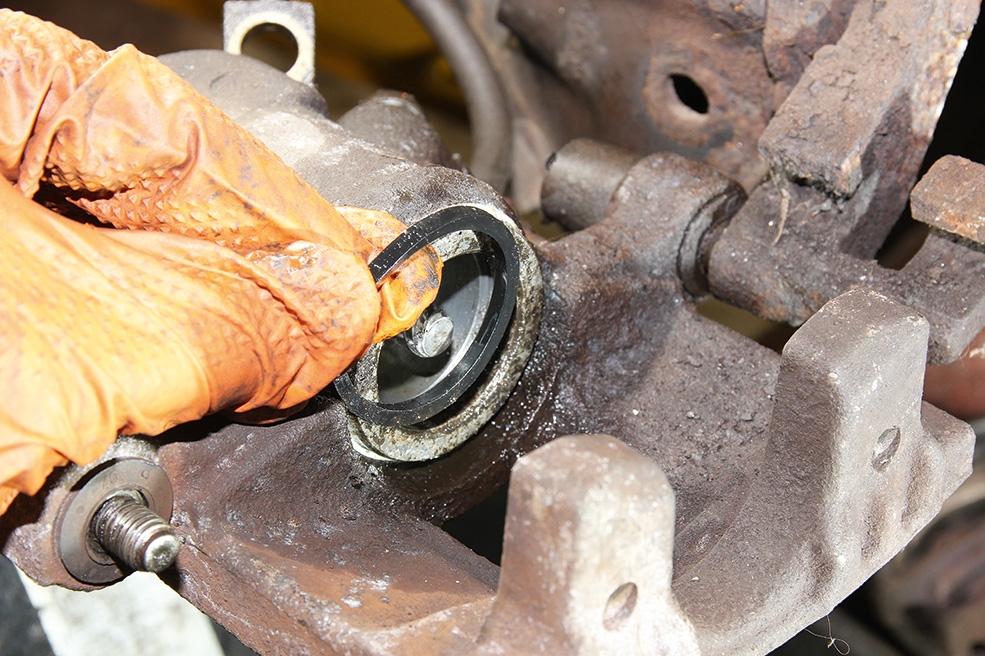
Once we had removed the offside rear brake disc, we realised there was a problem with the brake caliper – the dust boot was split, which could allow dirt and water inside. Perhaps as a result, the piston was difficult to wind back using the appropriate tool, or at least it was much harder to retract than the piston inside the nearside rear caliper.
The MoT in July 2020 listed ‘OSR service brake excessively fluctuating’, which could suggest the caliper’s piston was sticking, but more likely that the brake disc was warped. There was definitely a problem, so we decided to remove the OSR caliper and to overhaul it with a new seal and dust cover.
Removing the caliper was easier said than done. A mild steel sleeve for the handbrake cable is attached to the aluminium part of the caliper, and we all know what happens to steel and aluminium after several years together – they swell and corrode.
Consequently, we couldn’t separate them and so couldn’t remove the caliper without removing one half of the handbrake cable. we called mad4mini and they confirmed our fears, explaining they often had to cut them off, then renew the caliper and cable.
I decided to try overhauling the caliper in situ, so we spent £7.16 on a new seal kit from Bigg Red, forced the caliper’s piston out by pressing the foot brake, cleaned up the piston and inside the caliper (there was no corrosion, thankfully), then refitted the piston with a new seal and dust cover.
Relieved we’d managed to rescue the caliper, we wondered if we could also rescue the old rear discs and pads which still had plenty of material on them. We removed the rear discs, discovering the retaining screw on the NSR was seized, but a few minutes with a handheld blowtorch fixed that problem. We then used an angle grinder fitted with a flap wheel to clean the discs before reassembling the brakes.
While servicing the brakes, we decided it would be wise to refresh the brake fluid, which should be changed every two years.
Once the brakes had been reassembled, we went for a short test-drive and were horrified by the noise coming from the rear. Also, the brakes were catching and the brake pedal was spongy.
Promptly returning to base, we bled the brakes, checked both rear calipers’ pistons were working and retracting, then set off again. This time it was better, but we called mad4mini for a second opinion and visited the next day.
On the ramps at mad4mini, they took one look at the rear discs and explained they could not be rescued. The pitted corrosion wasn’t helping, and the OSR had probably overheated and warped. They also discovered that the rearmost bushes in the front lower arms were worn, which could affect the steering. And they connected their diagnostic equipment to check for fault codes, clearing some old irrelevant logged codes.
Returning home, we did what we should probably have done in the first place and replaced the rear discs and pads, then ventured out on several short test-drives to bed them in, checking their temperatures with an infrared thermometer. We suspect the OSR caliper is dragging at times, but it needs more test drives to see if the handbrake cable is sticking.
As for the worn suspension bushes that mad4mini discovered, we’ve booked that job in with them as it is a job best completed on a ramp, along with correcting the oil filter mistake we highlighted last time.
Electric window fix and suspension bushes
A thump on the door panel is the usual solution a non-working door window motor on a MINI One, but we weren’t convinced.
We removed the door panel to investigate and found that there were more Torx T27 screws holding it in position than we’d hoped, then found someone had probably already tried the thump technique but may have hit the speaker instead because it was damaged. We removed it, then greased the runners for the door glass, checked all electrical plugs were secure and tried again. Nothing.
Next, we checked the electric window fuse, which is located inside the passenger footwell, swapping it over with another one, but still there was nothing.
However, whenever we flicked the switch for the passenger window we could hear the motor whir for a moment, so we conceded and thumped the adjacent door panel at the same time. Miraculously, the door glass moved down, so we continued to wind it up and down to lubricate the runners and check we’d definitely fixed the problem.
Feeling confident we could fix some problems with a fist, we realised this approach wasn’t going to work for the worn lower arm suspension bushes that had been identified previously, nor the murky brown power steering fluid we wanted refreshing, nor the missing parts of the oil filter that now cause the oil pressure warning light to illuminate when the engine is warm and idling.
We needed the experts, so delivered the MINI to mad4mini. Before we knew it, they had the car on the ramp, the front bumper removed and the subframe dropped down.
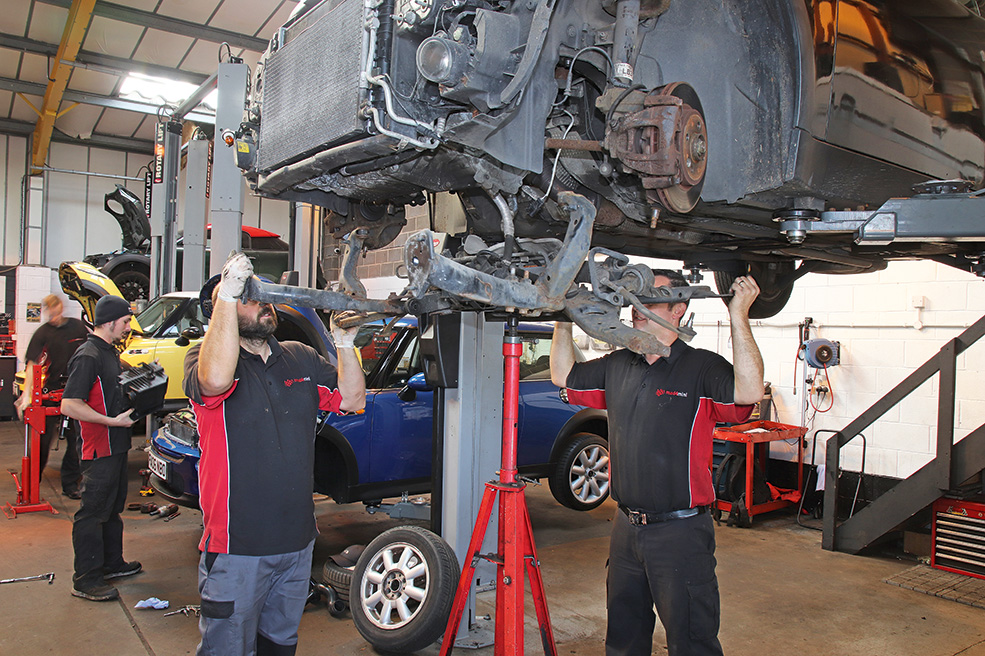
We were glad not to tackle this job at home because the subframe and power steering pipes and reservoir need a lot more clearance than we can hope for. We would need a hydraulic press to remove the old suspension bushes and fit the new ones (Powerflex polyurethane in this case).
The new suspension bushes have transformed the MINI. The steering is more precise (perhaps the fluid has also helped) and there are no more knocks and rattles. It feels and drives like a MINI should.
Inspecting for rust
Had we been working on a classic Mini, waiting 19 or 20 years to think about rustproofing would have been far too late. In the case of the BMW MINI One, however, it’s worthwhile planning ahead and assuming that any surface corrosion won’t go away.
Rustproofing is never a quick job and treating the mere surface corrosion on the underside of the MINI took five or six hours to complete, spread over four days.
Having the advantage of an inspection pit in our garage made the job of rustproofing the underside of the MINI very straightforward. Standing upright in an inspection pit means we can safely work with an angle grinder and wire brush to remove dirt and surface corrosion.
We used a rust inhibitor to treat any remaining surface corrosion that couldn’t be physically removed. This turns the iron oxide to iron tannate and helps to form a seal to prevent further rust occurring. However, it also acts as a primer, so needs to be painted.
The rear section of each sill is covered in light surface corrosion, so it’s cleaned, treated and painted.
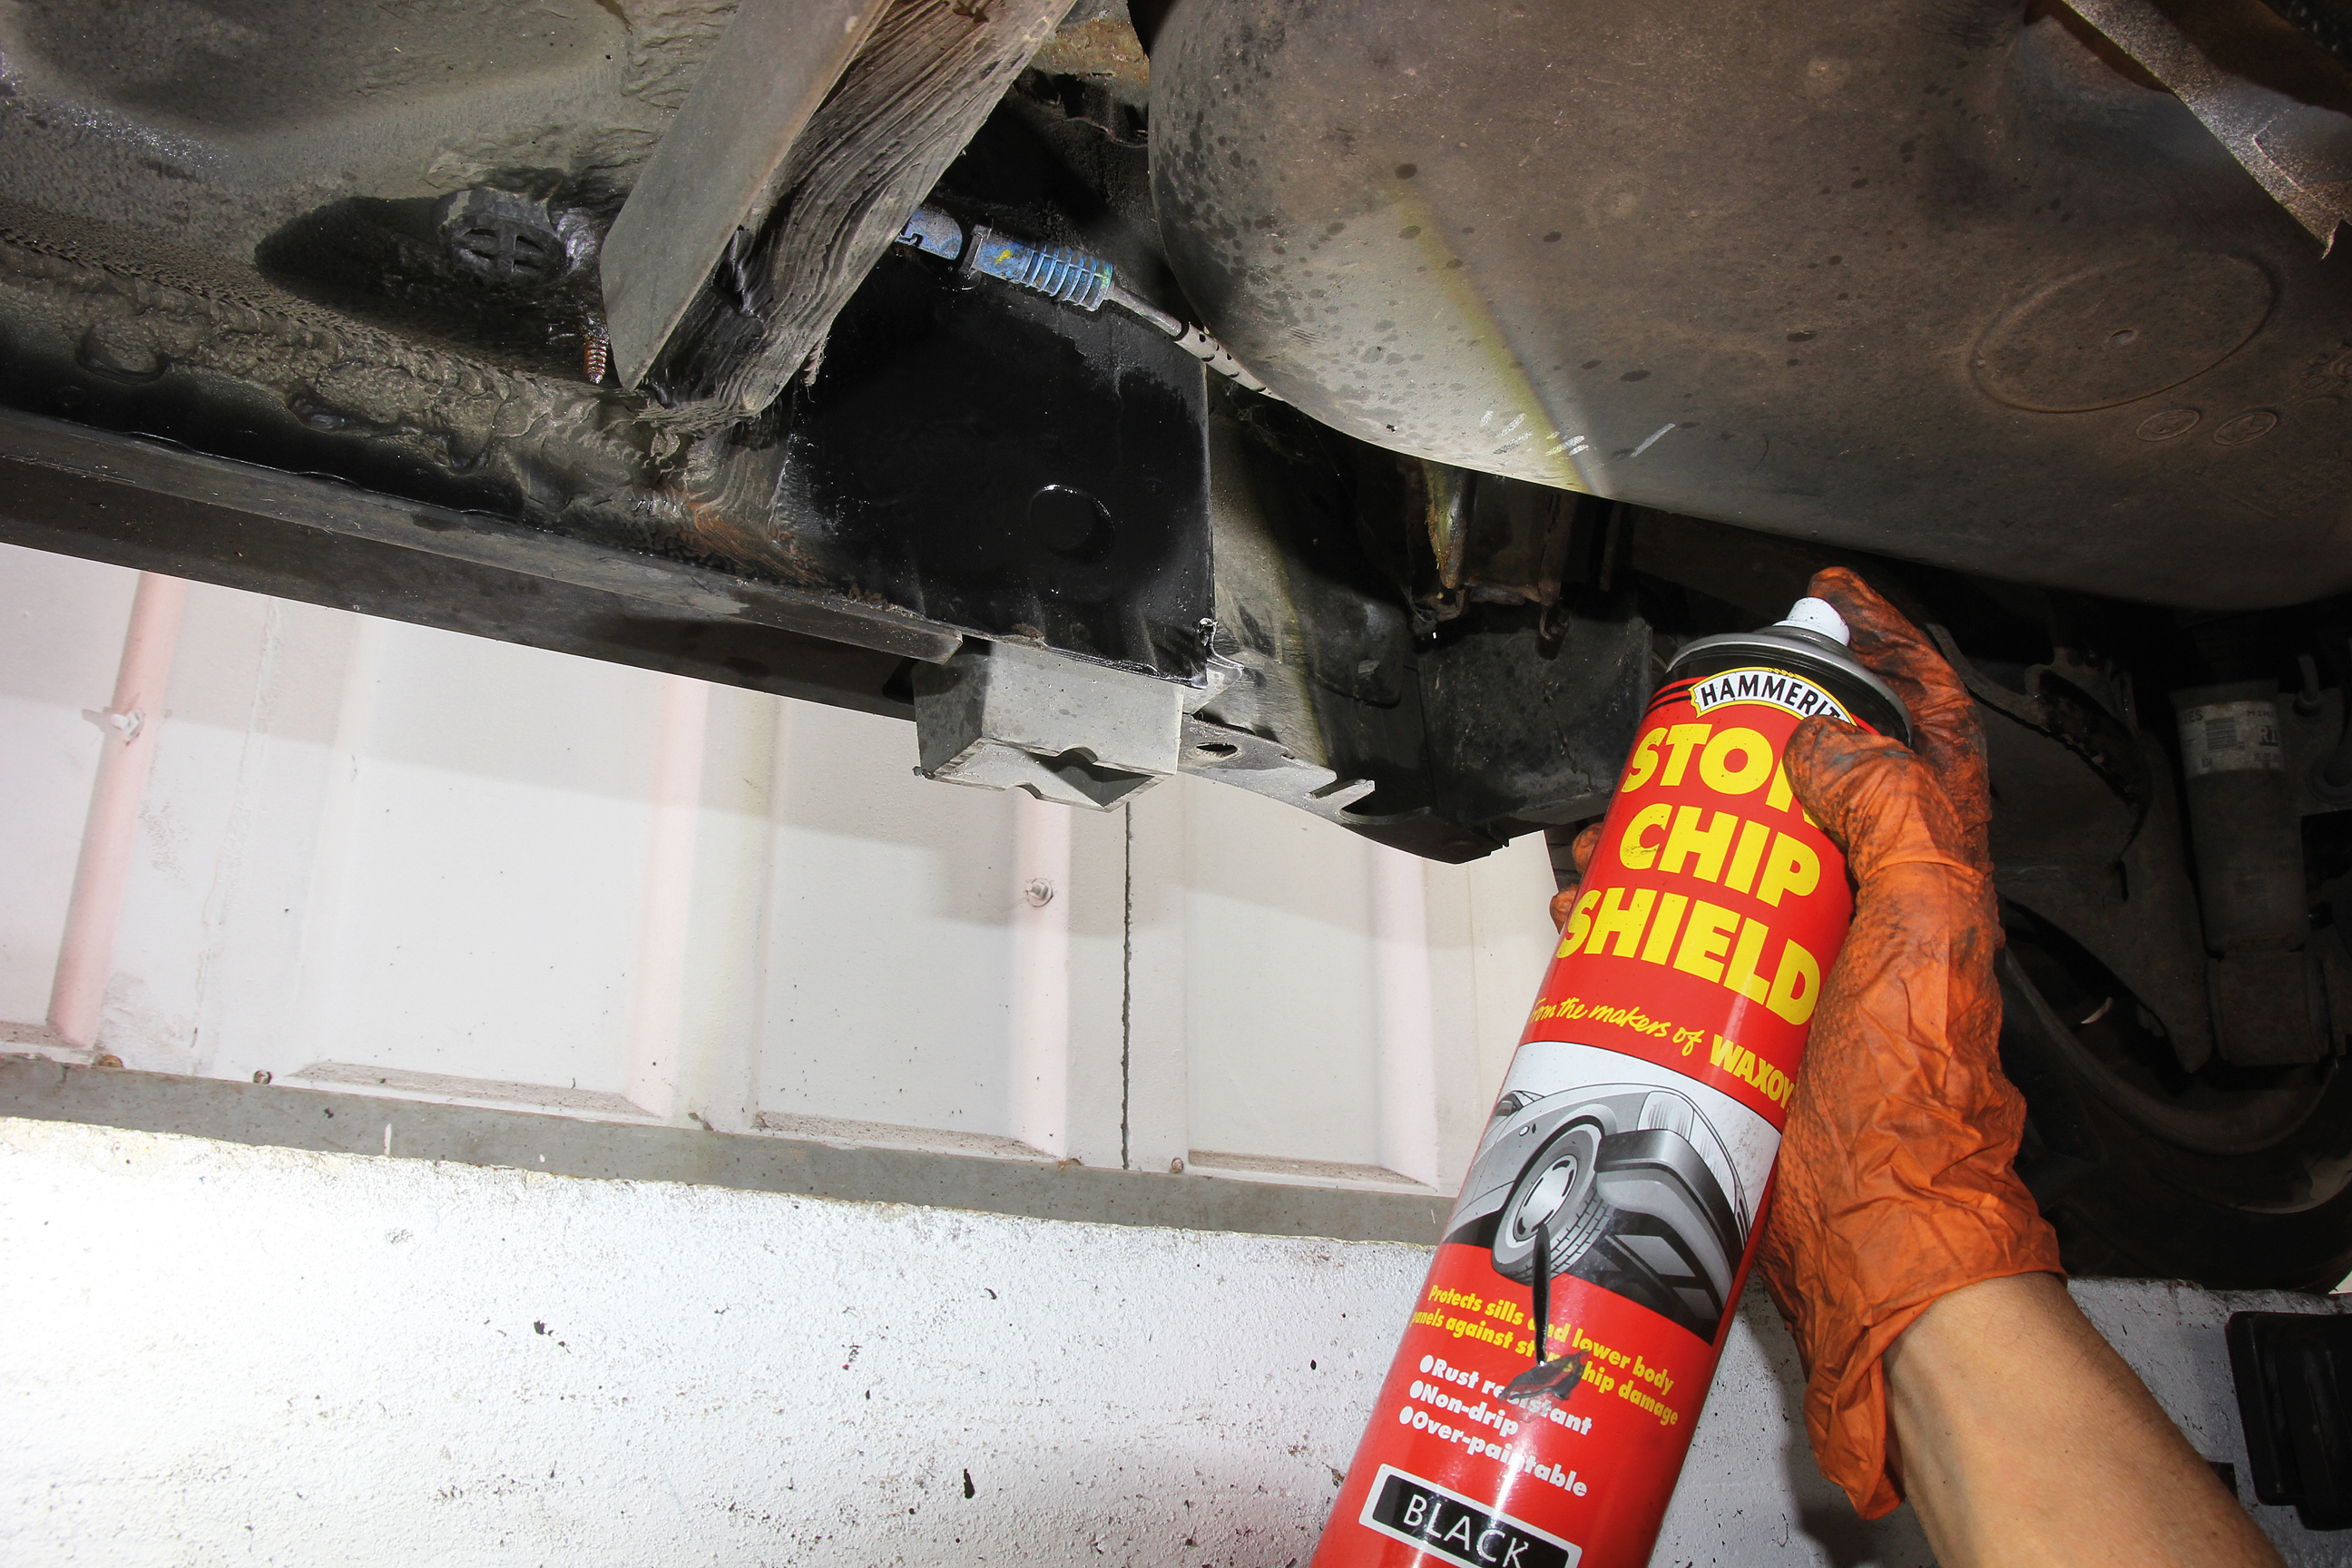
We used a stonechip paint for this. In some cases we decided to add a further layer of rustproofing, either in the form of underseal or a lanolin-based solution called Prolan, which helps to provide a waterproof barrier. And where areas are inaccessible, such as inside chassis legs, we applied a thin coat of Hammerite Waxoyl to help repel moisture, although water should drain out of the many holes along these structural parts of the bodywork.
The condition of the underside of the MINI seems to be intact. The worst patch of corrosion we found was at the backs of the sills, close to the rear wheel arches. This area is partly concealed by a plastic trim panel, so we tried to remove it only to discover some of the fastenings had seized. These had to be destroyed with an electric drill and replaced.
Once we had better access to the sill area, we realised the corrosion was only superficial and could be treated in the same manner as the rest of the surface rust we’d found.
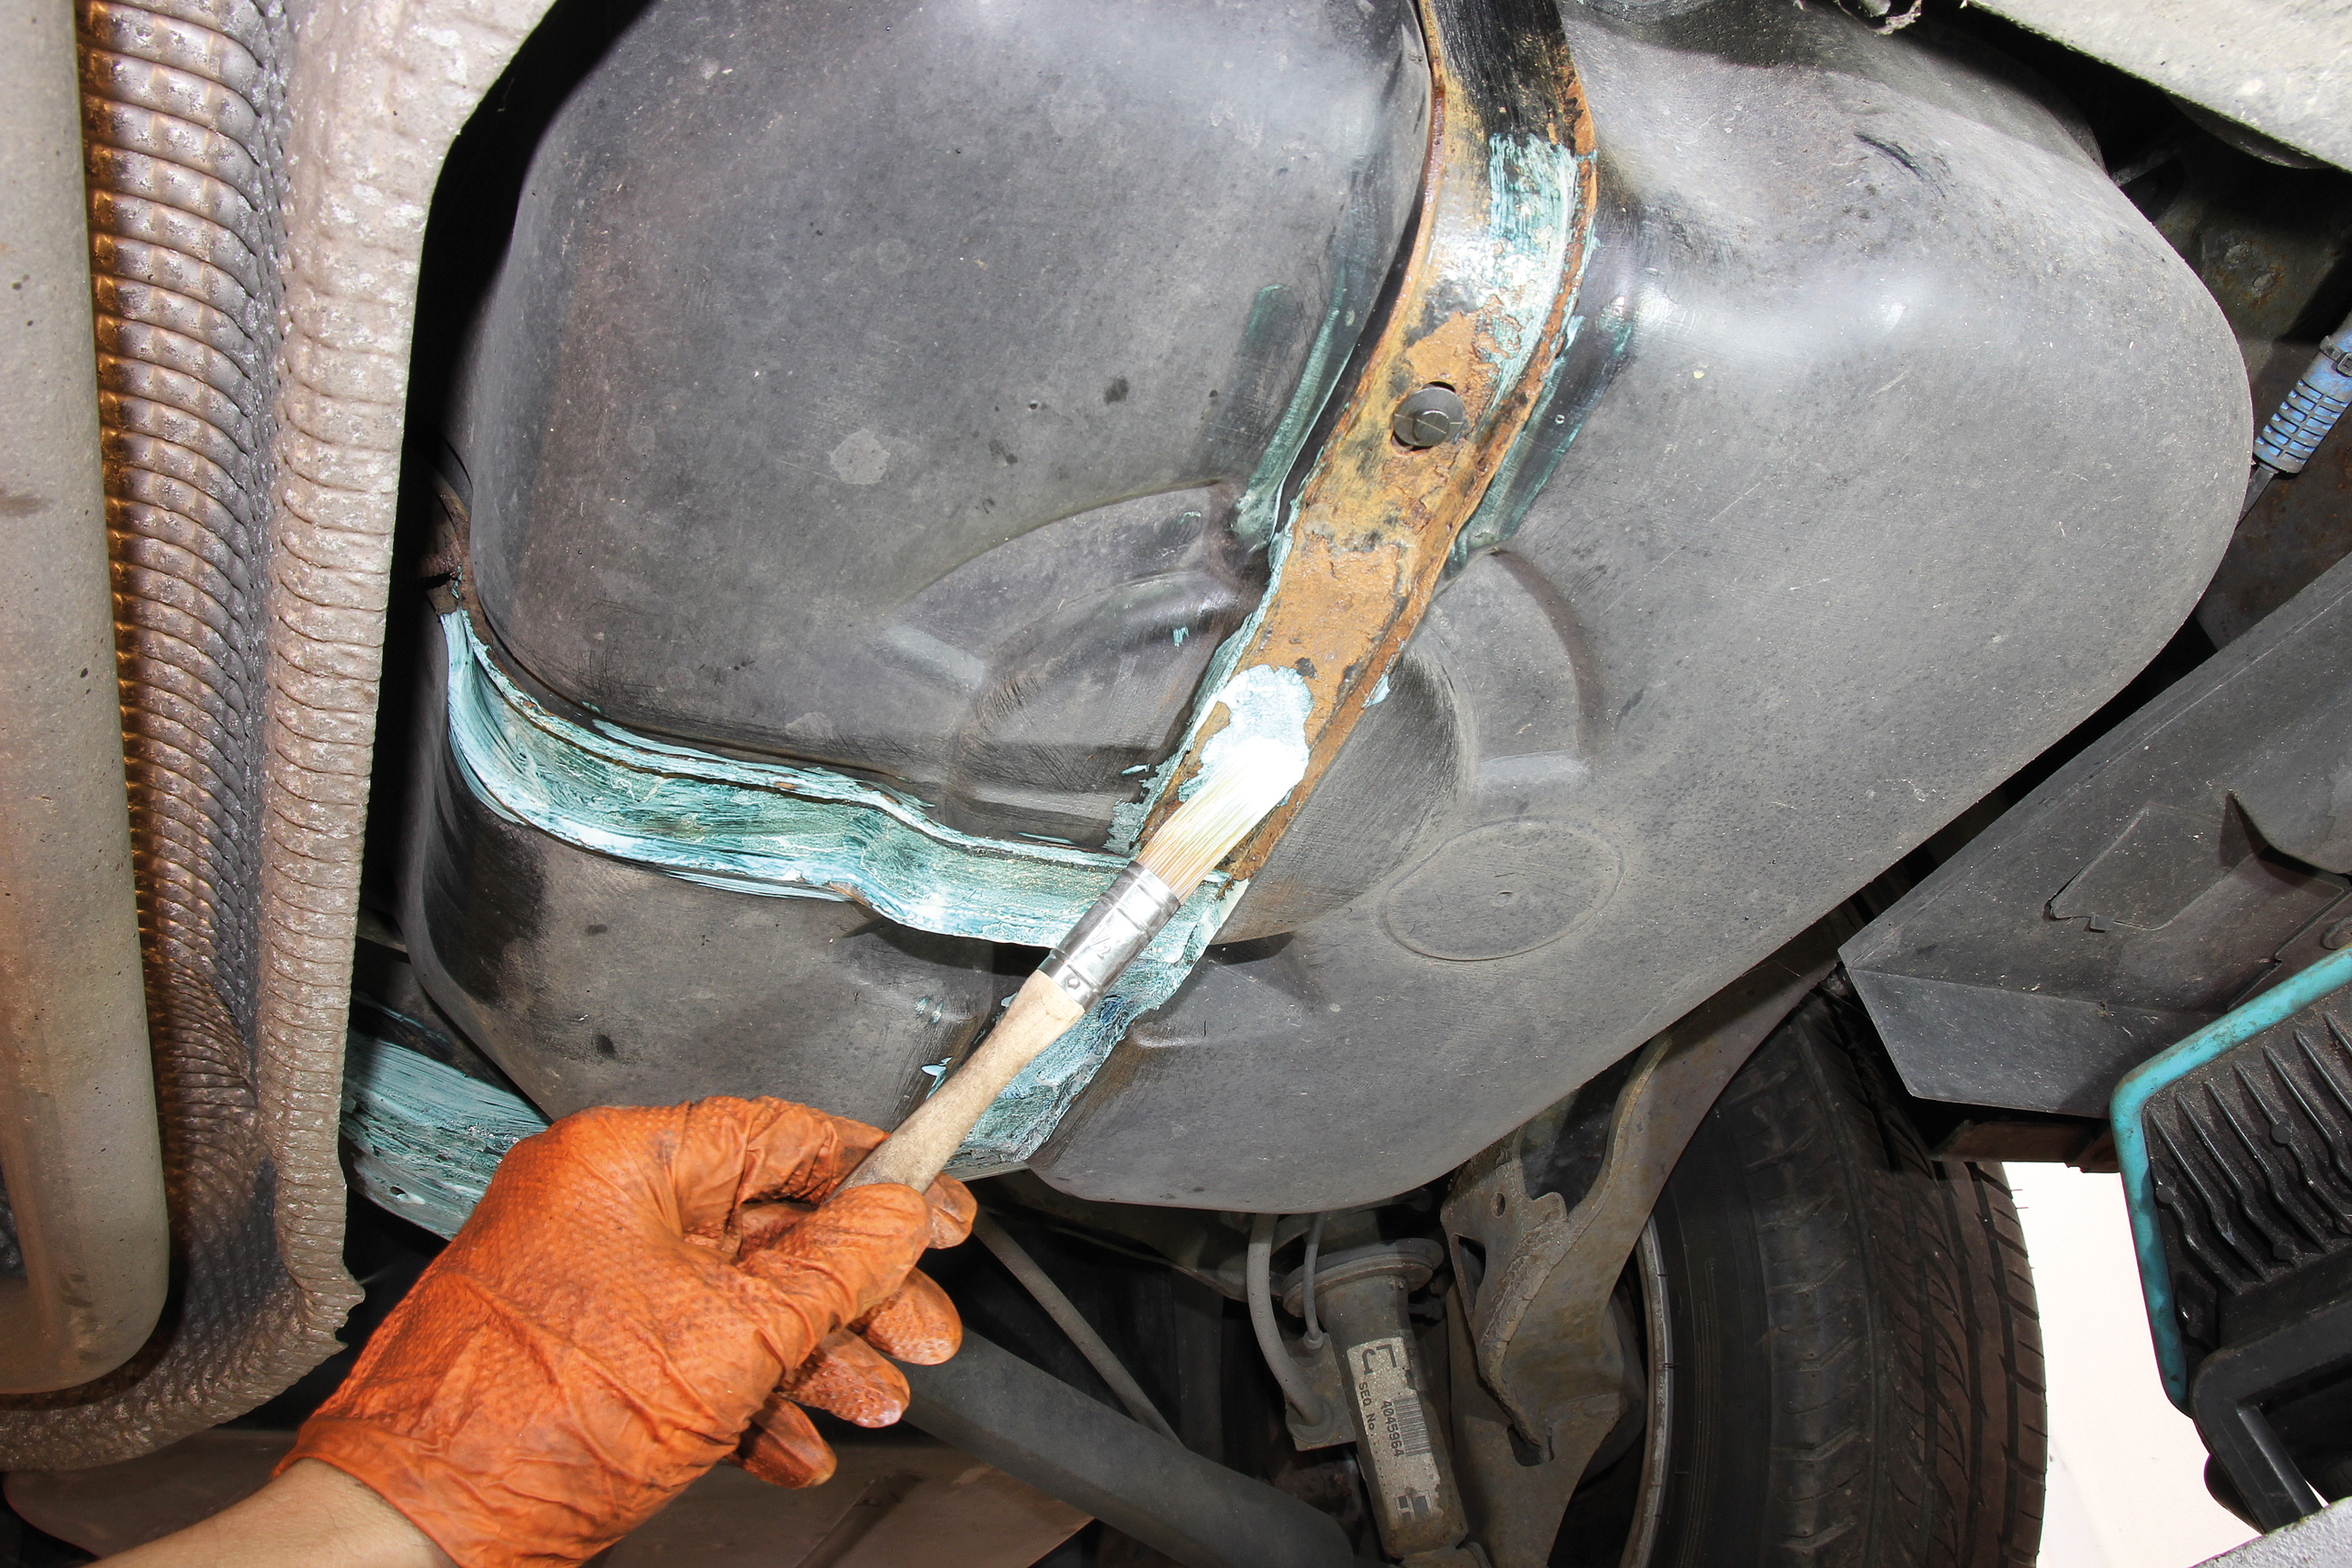
Rusty petrol tank straps are fixed with a wire brush, rust inhibitor, metal paint and a coat of Prolan.
One aspect of the underside that did initially concern us was the petrol tank straps. These were coated in flaky rust when we first inspected them, so we tried to partly detach them (they are routed over the exhaust system in a saddle design) to be able to clean and treat both sides.
After scrubbing them with a wire brush, we applied a rust inhibitor, followed by a stonechip paint and finally a coat of Prolan. The lanolin in Prolan is sourced from sheep, so the underside of the MINI did smell like a farmyard for a few hours, but seems to have worn off.
One area of potential corrosion we needed to address concerned the boot. The boot floor had already filled up with water, so we wanted to drain this, treat any corrosion and then find and fix the source of the water ingress.

With the boot stripped, we released the rubber drain plugs and lets the unwanted water escape.
With the boot emptied, we removed the plastic undertray, prised out a few drain plugs and had a drain tray at the ready. The clean water ran out, allowing us to dry the boot floor and breathe a sigh of relief at the lack of corrosion. Even the exposed area of the boot floor was rust-free.
Next, we had to find the source of the water leak. There are a few common causes, including the high-level brake light, tailgate seal and plinth, and the rear wiper. We discovered the tailgate seal was damp, especially around the middle bottom edge. Could water be leaking past the components above it, which include the wiper, plinth and brake light?
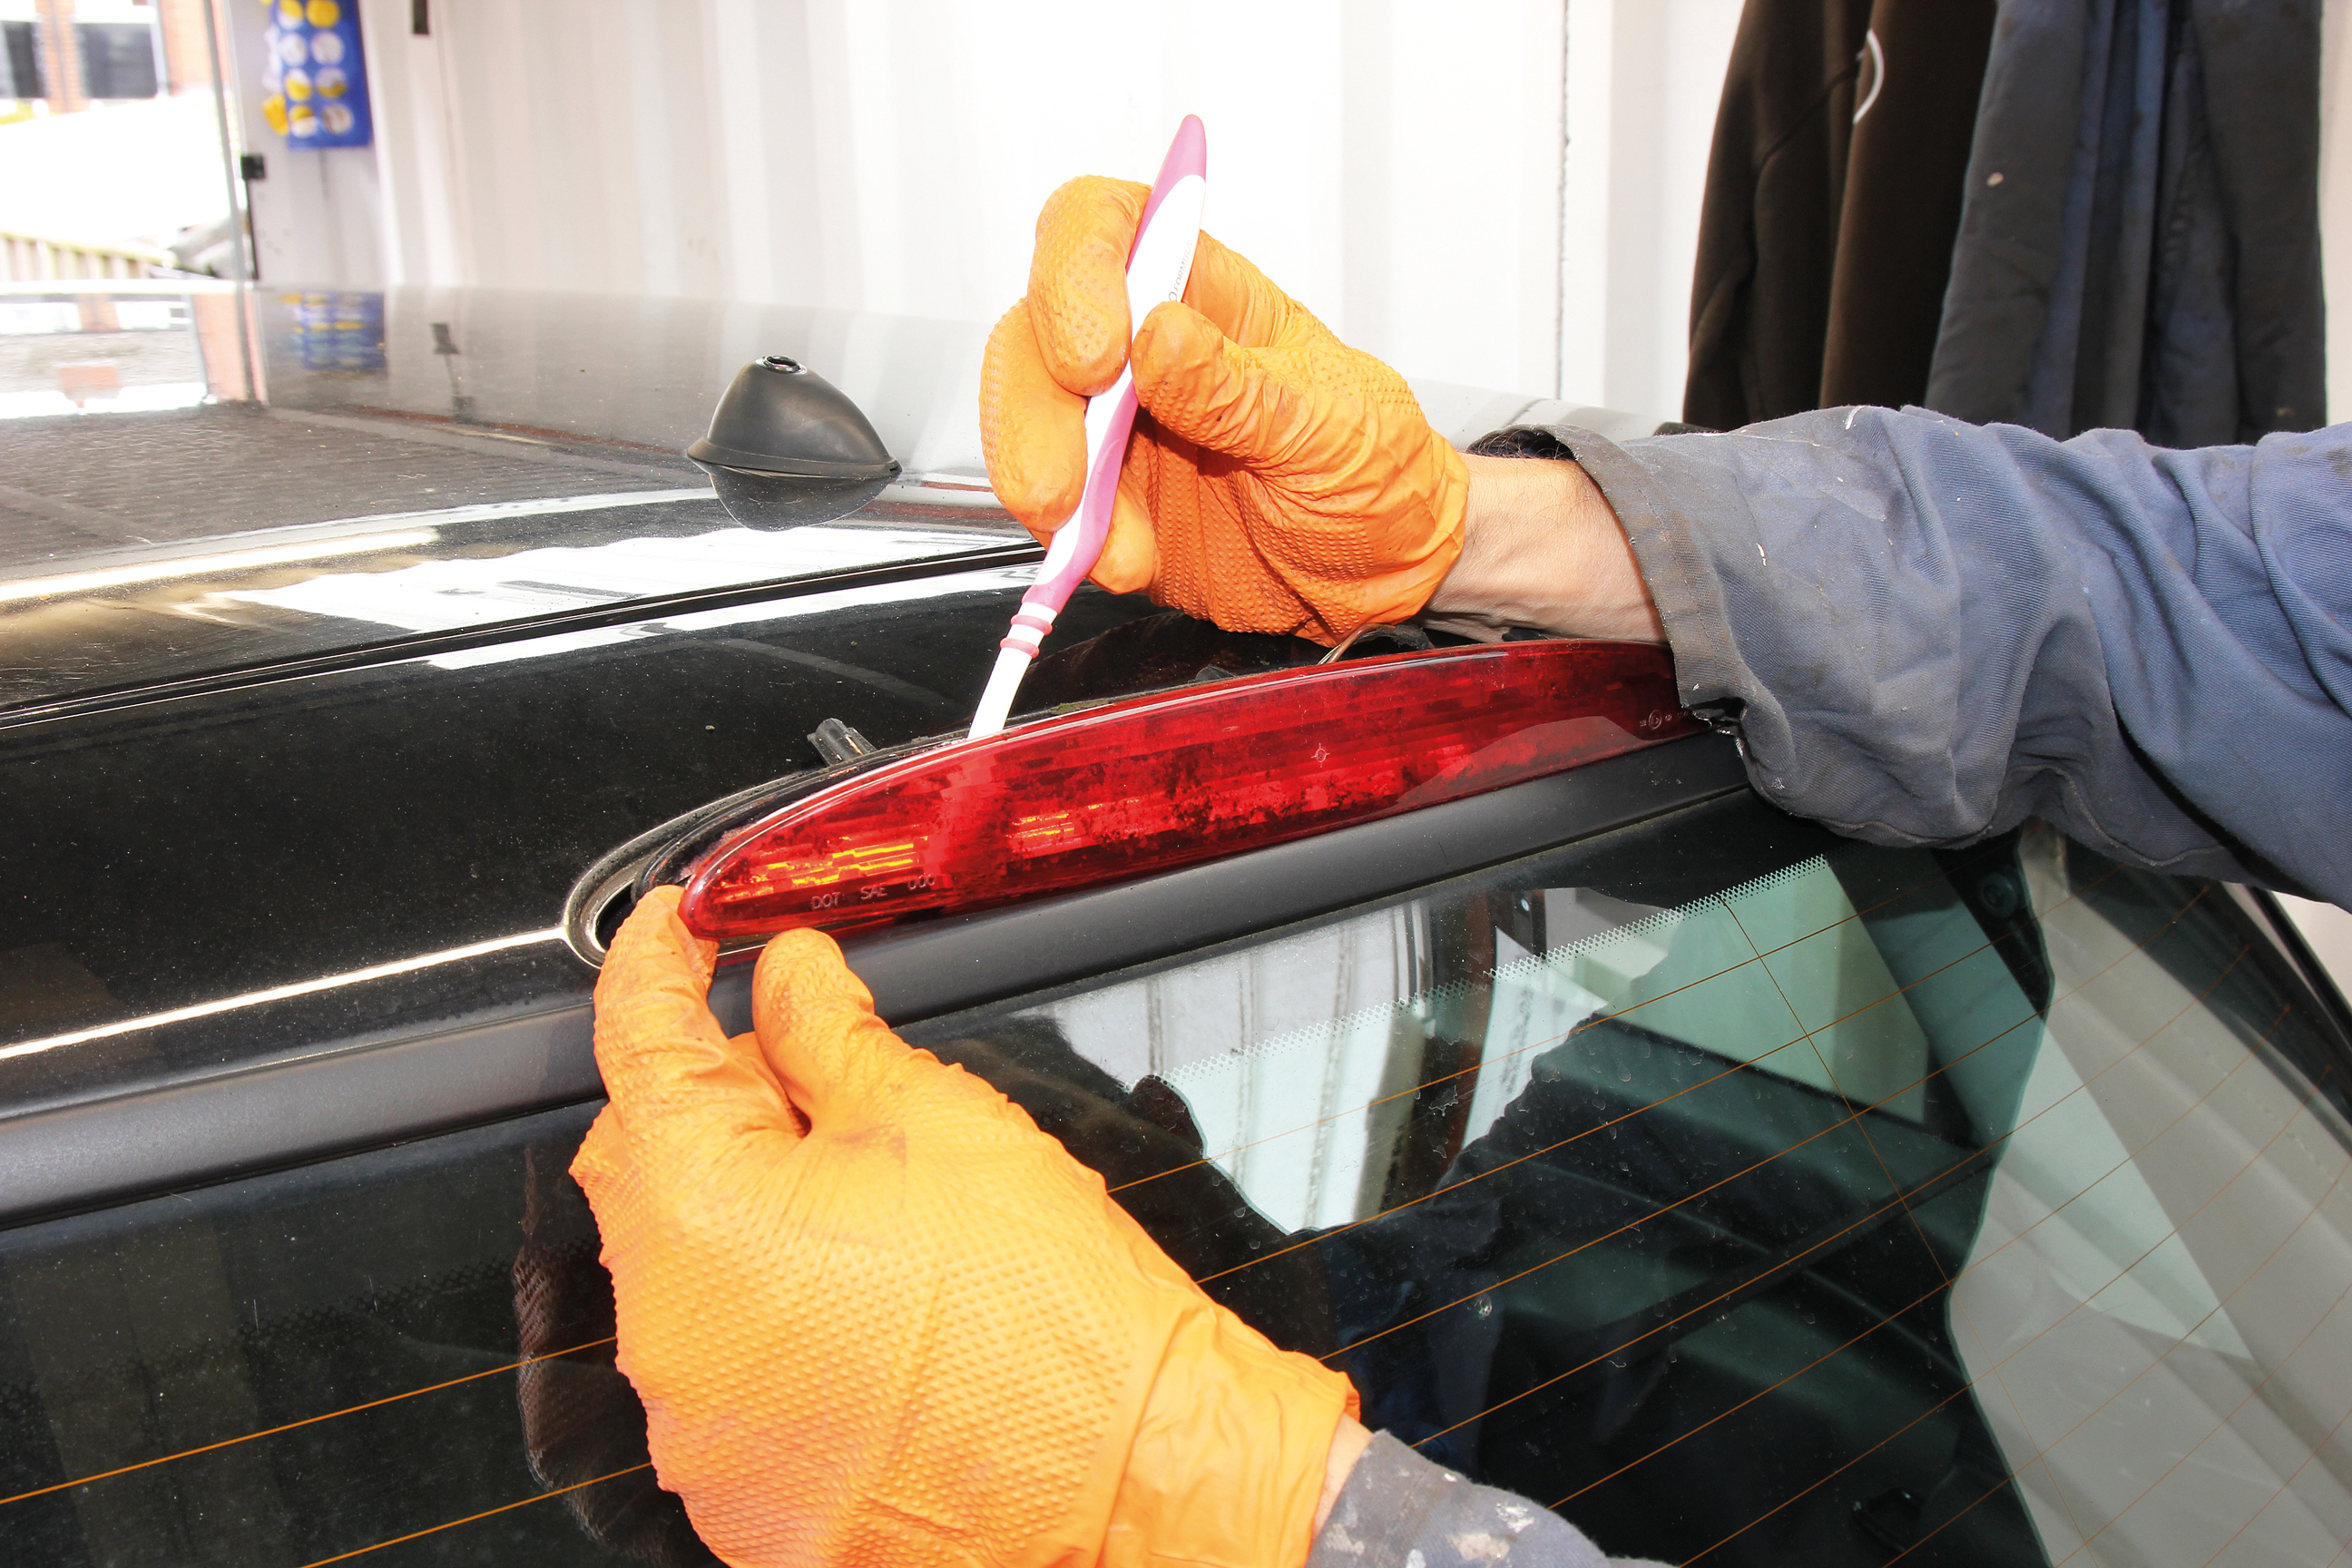
Water can run through into the boot via the high-level brake light, so it’s removed, cleaned and resealed.
There was only one way to find out, so we removed each one in turn, checked any seals or gaskets, cleaned away all traces of dirt and refitted parts or resealed them where possible with rubber grease that helps keep rubber seals supple.
The high-level brake light wasn’t too difficult to remove, secured with Torx T20 screws. We found lots of mould inside, so water had been trapped, but has it leaked down into the boot?
The plinth was similarly easy to remove, clean and reseal. This time, we could see how water could leak past the holes in the tailgate where the wiring for the rear reg-plate lights is routed, so we sealed these areas with a little grease. It may help, but we’ll have to wait to find out.
As for the rear wiper, after removing the trim panel on the inside of the tailgate, we wondered whether it would help to remove the motor and wiper arm to reseal it, but realised the wiper arm was seized onto the motor’s spindle. Penetrating fluid didn’t help, so we’ll have to leave this job for now.
Rear brakes, cooling system mystery and noisy aux belt
You could say that we’ve well and truly shot ourselves in the foot over the MINI One’s rear brakes and consequently spent more money than necessary.
We should have read the signs when its MoT in July 2021 failed due to the offside rear brake fluctuating excessively. We’d assumed the brake disc was warped and having noticed the dust boot for that caliper’s piston was split, wisely replaced it along with the seal inside.
However, we’d assumed the handbrake cable was okay, despite the fact that its metal outer sleeving was seized to the caliper, although when applied, the rear brakes did lock. And when we realised we couldn’t save the old but newish rear discs and pads, we hoped everything would be fixed with a new set.
In theory, we could have been lucky, but we weren’t: and typical of rear brakes on the R50 MINI, a new set of calipers and handbrake cables is a wise investment.
Earlier, we’d explained the offside rear brakes had overheated, but had found the caliper wasn’t consistent in dragging. However, we realised something had to be done about it, but knowing the handbrake cable was seized to the caliper, we called on mad4mini to help and booked some workshop time.
There’s less than 100 miles on the rear discs and pads, but the offside has been dragging so much the disc has a blue tinge, is probably warped and the edges of the pads have turned white.
They were confident a new OSR caliper and a couple of handbrake cables would fix the problem. They thankfully had the same trouble as we did when it came to separating the handbrake cable from the OSR caliper (and the cable hardly moved inside its sleeving), so they used an angle grinder and cutting disc to slice through the mounting lug on the side of the caliper to release the cable. Luckily, their caliper remanufacturer is happy to alloy weld a new mounting lug in situ.
Removal of the handbrake cables isn’t as straightforward as we’d anticipated, requiring a stripdown of the centre console to loosen the 13mm nut below the handbrake lever. Plus, the rear of the exhaust system needs to be dropped down and a heatshield above it removed. Then the cables can be extracted and new ones fitted.
One look at the new offside rear brake disc and pads declared them bin fodder. The disc had a blue tinge to it, suggesting it had overheated and could have warped. The edges of the friction material on the pads had turned white and there were metal filings all over the edge of the brake disc. With a new set of discs and pads costing around £100, it was a false economy to ignore this.
Driving home from mad4mini on the next day, the second set of replacement rear brakes needed bedding in, so we were gentle on the middle pedal, but we now had a handbrake that was light to operate and responsive.
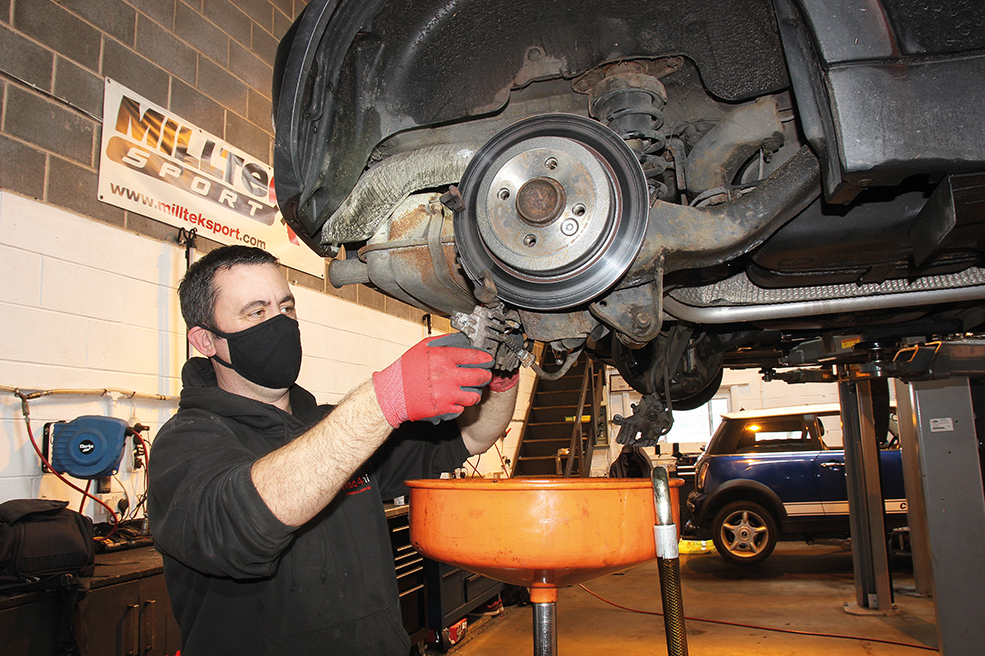
Mike at mad4mini removed the offside rear brake caliper after slicing through the mounting lug on the side of it to release the handbrake cable.
However, we also had another problem to solve – the coolant temperature was three-quarters warm. We stopped and checked the coolant level to find it was close to max inside the expansion tank, so we cautiously returned home with the heater on hot and the windows wound down. The MINI’s battery had been flat that morning, so mad4mini had to jump start the engine and left it running to recharge the battery. Had it simply got too warm?
A few hours later, and with the engine cold, we went for another test drive and this time the coolant temperature warmed up quickly and was three-quarters hot within a couple of miles. We drove home and let it cool down, then we ran the engine on the driveway and used an infrared thermometer to check the temperature of the radiator and heater hoses. After half an hour, the heater hoses were 70-80°C, whereas the radiator and its hoses were around 40°C.
After a quick call to Martyn Knowles at Car Mechanics magazine, he suggested disconnecting the battery for half an hour. Why? Well, he’d heard of a few electrical issues on early MINIs, and more so after jump starting them. The next day we went for a test drive and this time, the temp gauge got no further than the halfway mark.
Other mysteries include a noise from the auxiliary drivebelt. It sounded like a dry bearing from one of the pulleys for either the air-con pump, alternator, water pump or auxiliary drivebelt tensioner. We assumed it would be a quick investigation, involving the renewal of the belt to eliminate it from the cause and close examination with a stethoscope to identify the offending pulley. Unfortunately, we were wrong.
A special tool is required to adjust and lock the auxiliary drivebelt tensioner, enabling the belt to be removed.
With the MINI One inside the garage, we removed the offside front inner wheelarch trim along with the undertray for the bumper. We now had a good view of the front of the engine via the wheelarch and underside.
We also moved the tank vent valve out of the way from inside the engine bay, so we had better access from above. We then discovered a major sticking point – we needed a special tool to adjust the auxiliary drivebelt tensioner so that we could remove the belt.
With the correct tool to adjust the tensioner – a 3/8in square drive – the belt was straightforward to remove. We then ran the engine with it removed and of course, the noise we heard wasn’t there. We fitted a new belt and the noise returned, so we carefully used a stethoscope to try to identify where the noise was coming from – but we couldn’t accurately find the source.
We called mad4mini for advice and they suggested applying maintenance spray around each pulley in the hope that it might lubricate a dry bearing. After spraying around each pulley, nothing changed, but the next day, we started the engine and the noise had gone. We’re still keeping our fingers crossed!
Shakedown testing
Words: Rob Hawkins
This has been a strange and challenging project car to cover, but thanks largely to a pandemic rather than any particular foibles with the MINI. I’ve been unable to follow jobs at workshops as thoroughly as I’d like to, and even something as simple as taking a car for an MoT test was halted. However, with the help of other magazines, namely Car Mechanics magazine and its editor Martyn Knowles, the MINI One project has been completed and successfully MoT tested.
All of the repair work on this car was conducted in advance during the latter half of 2020, allowing plenty of time for plans to change and things to go wrong before the project series appeared in Classics Monthly. Consequently, anyone wishing to check the car’s online MoT history will discover it was successfully tested on the 30th December last year, and thanks to the MoT extension on the previous ticket, this one is valid until 22nd January 2022. This was after the brakes had been repaired, which was covered in last month’s instalment.
So in an attempt to bring you up to date with the MINI One, this final episode covers several months. Back in December, the situation with the Covid pandemic was deteriorating, I had been told to shield again, but the MINI One was pretty-much finished and ready for an MoT test. Martyn Knowles was intending to collect the car, so we hatched a Covid-friendly plan, involving him delivering a car to me for featuring in Car Mechanics magazine, and taking the MINI One back home. Each car would be de-contaminated, and in the case of the car being delivered to me (a Fiat Punto Evo GP), it would also be left in my garage for several days.
Prior to the car swap, I test-drove the MINI locally on several occasions to make sure there were no further issues. On these tests, the nearside front indicator had good and bad days – sometimes it worked, other times it needed a waggle of the bulb. Even a new bulb didn’t fix it, so maybe the holder has a problem – I tried spraying contact cleaner inside it, but the jury is still out on whether that has done the trick. On the other hand, as the rear brakes started to bed in, I became more and more reassured that they were now finally and completely fixed. And the handbrake was noticeably better, too.
I conceded that the dodgy-looking paint on the bonnet would have to remain for now as I couldn’t access a bodyshop to cover this repair, but I realised I could do something about the faded exterior plastic. Meguiar’s came to the rescue with a cleaning solution and a black plastic revival potion. The cleaning solution certainly helped to remove the dirt, but the black plastic revival gel made a huge difference to the wheelarch trims and the trim along the bottom of the bumpers. It even revived the roof gutter trim, but the utterly faded nearside door mirror cover was perhaps too much of a challenge. I tried my best and applied the treatment several times, but I guess that there is a point of no return.
Using a cleaner and treatment, Rob managed to successfully revive most of the exterior black plastic on the MINI One.
On the day of the car swap, I discovered the MINI One’s battery was flat, despite it having been OK a few days previously. Jump leads attached to my Audi A3 soon had the engine fired into life, and I left it running for half an hour to help recharge the battery. Mysteriously, the battery hasn’t done this again, so it’s only mad4mini (see last month) and me that seem to share this problem.
When Martyn arrived, we swapped keys and cars at a safe distance and he was soon on his way back home in the MINI One. Thankfully he made it home without any problems and I breathed a sigh of relief. He managed to MoT test the MINI One on the 30th December and texted me the good news that it had passed. So the hard work had paid off, although – as is typical on a 20-year-old car – there will always be a job to do and potential problems to look out for.
Noisy auxiliary drivebelt problem seems to have been fixed with a spray of light grease.
I asked Martyn to periodically check inside the boot floor to see if any water had returned, and it hasn’t. The offside front indicator managed to behave itself and work properly for the MoT test, but the temperamental operation has since returned, so a replacement bulb holder is the next plan. As for the noise from the auxiliary drivebelt area, this hasn’t returned, so it seems that my lubrication fix has worked. And the faded black plastic is still looking good, except for that worn-looking nearside door mirror cover. At least the brakes are fully operational, the engine servicing is up to date, the steering doesn’t feel clonky and the new suspension bushes have restored the car’s ride quality.
Buying this MINI One from auction without viewing it was a bit of a gamble, but it seems to have paid off. In this case, it’s shown a new set of unforeseen problems to the usual rust that can turn many a car project into several weeks spent welding in repair and replacement panels. Maybe the next generation of classic cars won’t have so many rust issues? However, the issues that we have covered, such as brakes and suspension, are nothing new and are only to be expected with such an age of car. Certainly we could have been unlucky and found major engine and gearbox issues, but it does seem as though we got away with it!
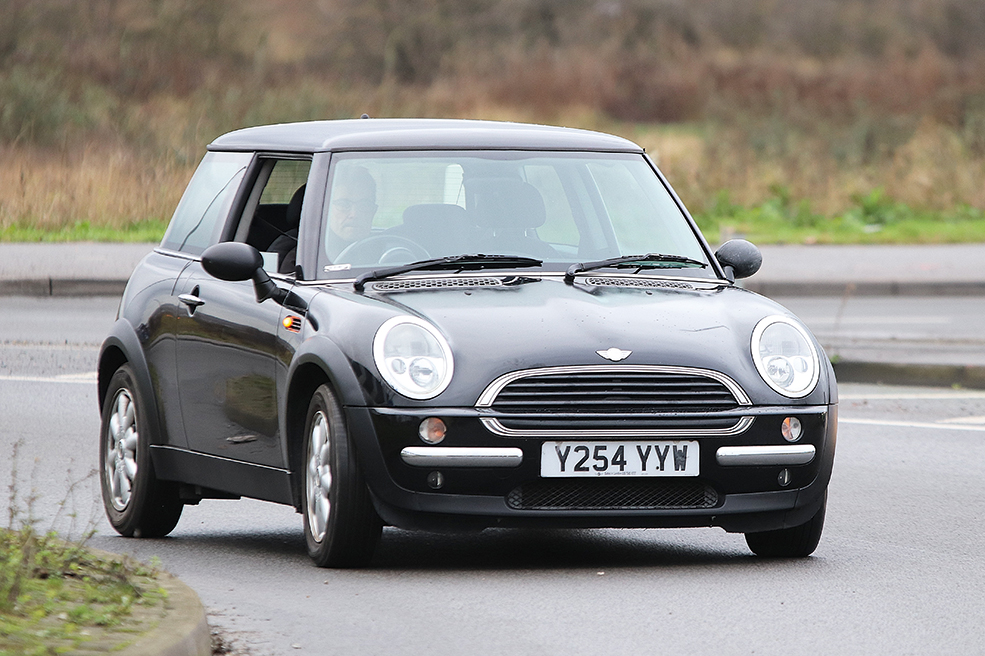
Rob puts the MINI One through its paces on several local test-drives to ensure the brakes are bedded in and no major problems are left undetected.
One point that is for certain is that the MINI One, particularly a very early car such as this, is worthy of being viewed as a classic car, or at the very least of being an emerging classic that is well worth saving. As we have found, many jobs can be completed on a DIY basis and many of its typical problems can be fixed at very little cost. This was put into sharp perspective by the next project car that was delivered to me, which was by sheer chance a 2009 R55 MINI Clubman Cooper S.
With more interior space and a powerful 173bhp, 1598cc turbocharged petrol engine that claims a 0-60mph time of 7.4 seconds, the Clubman seems to be the better car when compared with the older MINI One. Yet whilst it is entertaining to drive thanks to the performance figures, the ride quality is awful – it’s too harsh, which I blame on the wrong choice of low-profile tyres and a stiff suspension set-up.
On smooth roads its handling characteristics are impeccable, but on rough or uneven roads I often don’t know what to expect. Sometimes the tyres will tramline over undulations, which is worrying when trying to brake. Hard acceleration may result in torque steer, and if this happens when exiting a corner, I often feel as though the tyres are skipping (I’ve checked their pressures and tread blocks), especially after hitting a minor defect in the road. And don’t get me started on potholes and sunken manhole covers; they are best avoided in this MINI.
MOT: Successful MOT test on 30 December 2020 was a relief after the extension in July.
The later Clubman hasn’t been devoid of problems either, many of which are typical for the R55 series, including leaking engine oil and coolant, and water leaking into the boot and passenger footwell (via the inoperative sunroof). We were lucky with the timing chain as this had been replaced before we bought the car (the plastic guides become brittle and fracture), but I noticed some problems inherited from the R50, such as corrosion at the backs of the sills and the rear subframe.
So I’d have the R50 MINI One over the faster and seemingly better R55 Clubman Cooper S. If history repeats itself, then the Clubman Cooper S will become a more valuable classic, but the charm of the early MINI can’t be ignored. It may take another 20 years for people to fully appreciate these cars as classics, but at present, you can have a lot of fun for very little money.