Here’s our complete guide to rustproofing – including the chemistry of corrosion and how to tackle the dreaded rot
Words: Rob Hawkins
Rust, tinworm, corrosion; whatever you choose to call it, that dreaded brown, crumbly menace has shortened the life of countless vehicles. And it is not only steel panels that can corrode. Copper brake lines can turn green with oxidization, and aluminium develops a white, flaky surface. However, steel suffers the worst fate, as it breaks down into the brittle iron oxide we hate to find bubbling beneath the paintwork or spreading through sills and wheel arches.
There are numerous methods for helping to prevent the spread of corrosion through a vehicle, so we’ve outlined the popular ones over the following pages and the best methods we’ve found for keeping rust under control. There’s no easy method and once rust has taken hold, it’s hard to keep away, especially if you use a vehicle every day.
Whilst it’s important to know how to protect a vehicle from corrosion, it’s perhaps just as important to understand how rust forms. For corrosion to occur, especially in steel, it’s worthwhile knowing what steel is and how this alloy is made.
To make steel, iron ore is extracted from the ground, smelted in a blast furnace where impurities are removed, but a small quantity of carbon (usually less than 1%) is added to make the iron less brittle so that it can be bent and shaped.
The chemistry of rust
Knowing what needs to be present for corrosion to occur is the next stage towards understanding the rusting process. Water and oxygen are the two ingredients. However, for the steel to turn into rust (iron oxide), the iron in the steel needs another element to help with the reaction. This could be the carbon that is contained in the steel, or another metal such as aluminium.
Let’s assume there’s an aluminium panel next to a steel panel on a vehicle. With water and oxygen present, which could simply be moisture in the air, the iron in the steel panel and the aforementioned aluminium panel form what is known as a galvanic cell. The impurities in the water help with the process that involves the transfer of electrons, turning the iron into iron hydroxide, which is also known as hydrated iron (III) oxide. Iron hydroxide is insoluble, so it precipitates out and forms a solid, which looks pretty much like the rust we see. However, if the water around it dries off, it becomes iron oxide, but you can easily have a mixture of the two, despite what you see is what is commonly called rust.
Whilst that explains how rust can occur when another metal is next to steel, such as a panel or a fitting (eg a bolt), what happens if there are no panels other than steel? Or why does a stripped bodyshell rust? Well, the small quantity of carbon in the steel is the problem. This works just as well as the aluminium to help with electrolysis that leads to rust.
You may now be feeling despondent by the fact that it’s very difficult to prevent the rusting process. The key to keeping rust away is to seal off the metal or isolate it using non-conductive paints, rustproofing products and similar coatings. Seam sealant, paint (primer, undercoat and topcoat), underseal and wax- and oil-based products all help to keep the rust away.
Using stainless steel or zinc-coated fixings will reduce the risk of them aiding corrosion in a steel panel. Stainless steel components do corrode, but that corrosion consists of a thin film that’s difficult to see, which luckily blocks any further corrosion. This thin film of corrosion also stops the component being involved in the electrolytic process of corroding a steel panel. Unfortunately, this appears to be less effective in aluminium panels, whereby stainless-steel fittings seem to last longer, but the aluminium becomes weakened.
Rust myths
There are some myths concerning corrosion. Some people assume that the electricity from the vehicle’s battery can aid electrolysis and accelerate corrosion. Whilst the earth lead from the battery is usually connected to the car’s chassis or metal bodywork, this doesn’t aid the electrolytic process of corrosion that we mentioned. Perhaps the only threat of corrosion from the battery is if the acid inside it leaks out and damages the paintwork.
Still on the subject of batteries, there is a process called cathodic protection, which is used on seagoing ships, concrete bridges with steel inserts and underground steel pipework, which works very well in these instances, but cannot be applied to motor vehicles. The process works by forcing a protective flow of electrons to the metal that needs to be protected. However, it also needs a means of bringing those electrons back to their source. In the case of the iron in a steel panel for example, this works on a boat or ship because the seawater completes the circuit. For a concrete bridge with steel inserts or an underground steel pipe, the wet soil completes the circuit. When it comes to a vehicle, the only way to complete the circuit would be to leave it in the sea or bury it in the ground.
And the final myth that needs to be dealt with concerns treating rust. There is no process that can turn crumbly iron oxide back to shiny steel. Surface corrosion, once all of the loose rust has been removed, can be treated with a rust inhibitor to turn any remaining iron oxide into iron tannate, but this only helps to block further corrosion and should be painted over and further protected after it has dried.
Rust issues
The most obvious problem that rust creates is holes in sills, door bottoms, chassis legs and other panels. However, there are a number of other areas on a vehicle that can become a similar headache. The suspension leaf springs and coil springs can corrode and fracture, or their mounts can similarly rust away and break. Brake components can seize, discs can become pitted and less effective.
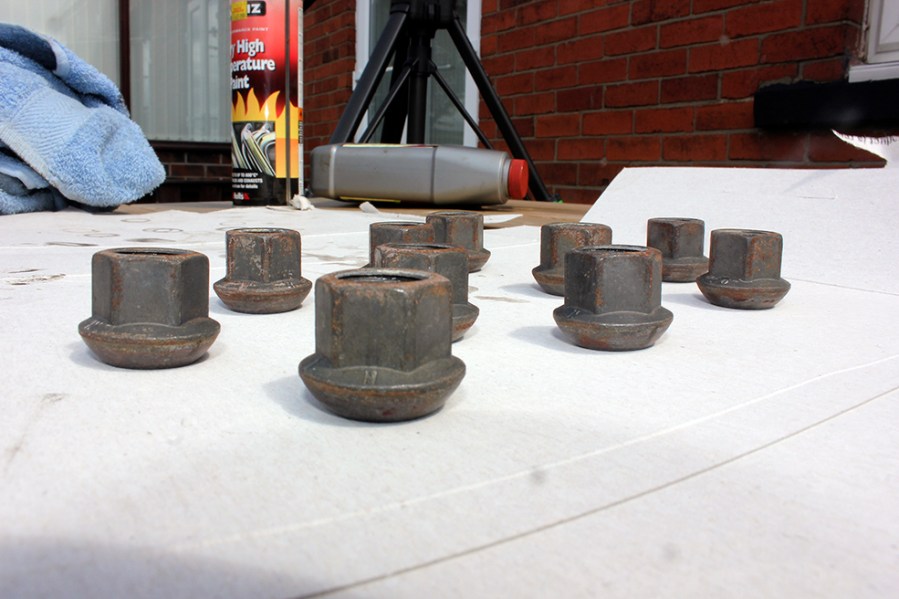
Even parts ranging from the wheel nuts to the bumpers can turn brown and unsightly. The following tips deal with many of these dilemmas and how to either avoid them, or in some cases if they have already started to corrode, fix them.

The vehicle’s battery doesn’t contribute towards the electrolysis process of corrosion. Only leaking battery acid and moisture around the battery can result in corrosion of the surrounding metalwork.
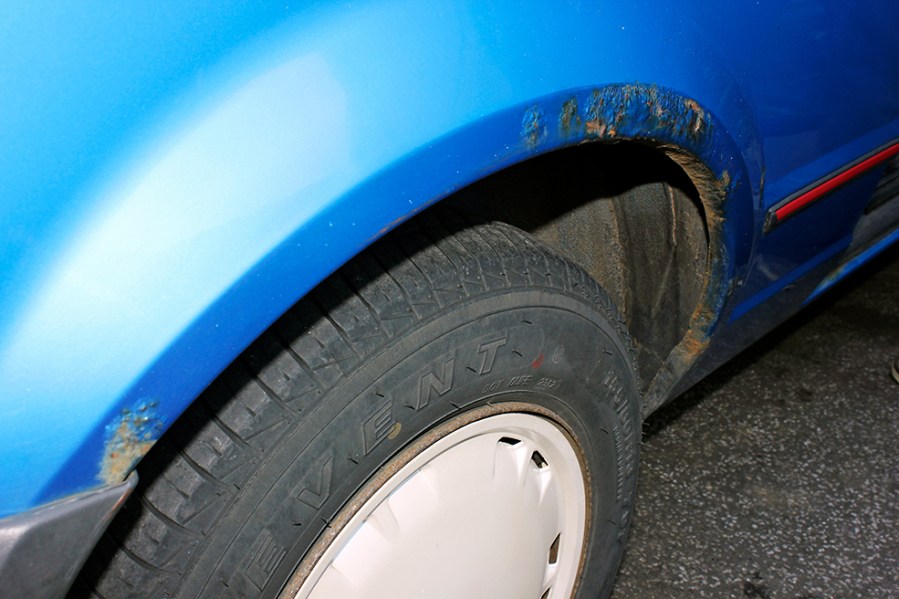
The dreaded bubbling paintwork suggests this steel rear wing is infested with iron oxide.
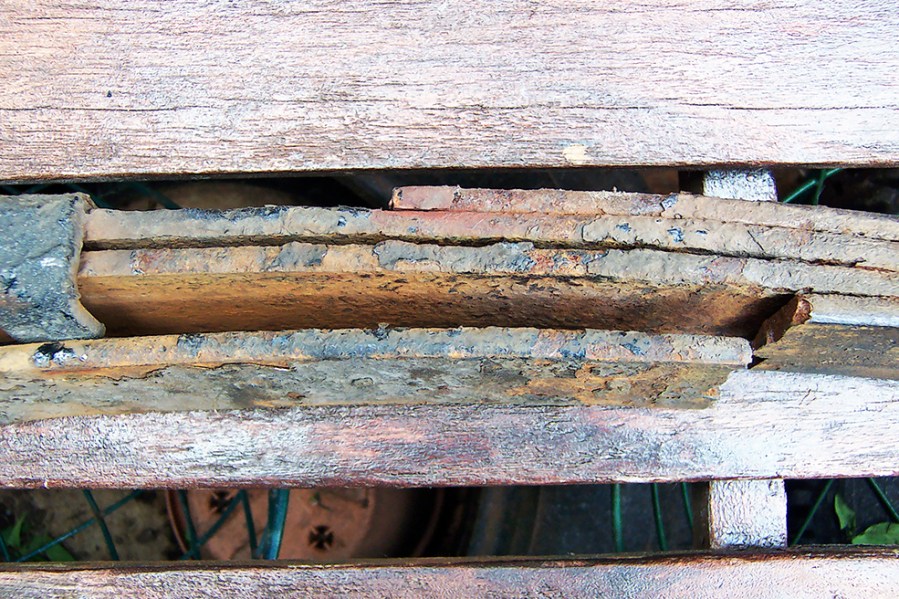
A moderately rusty-looking set of leaf springs, but look closer and one of the leaves has fractured!

Proof that a wax- and oil-based rustproofing solution works. After 25 years of storing in the open air, we cut a hole in the side of this can of Waxoyl and discovered the yellow stuff inside had done its job.
Nuts and bolts
Wheel nuts, bolts and similar fastenings can look particularly unsightly if they start to corrode. Some can be replaced with chrome-plated or stainless-steel fittings that should last longer, but often they can be revived by removing as much of the surface corrosion as possible, then applying several thin coats of protective paint. There are several different approaches to this method, including using a variety of cleaning methods such as a wire wheel on a bench grinder, a blasting cabinet and an ultrasonic tumbler.
The following steps show a reusable chemical method. There are also a number of ways to paint and protect fittings. For wheel nuts that are going to be undone and tightened, there’s a risk that any exterior paint will be damaged and chipped, so applying primers and durable metal paint may help. Applying a thin matt-finish paint may also help to reduce the risk of the paint finish being chipped.
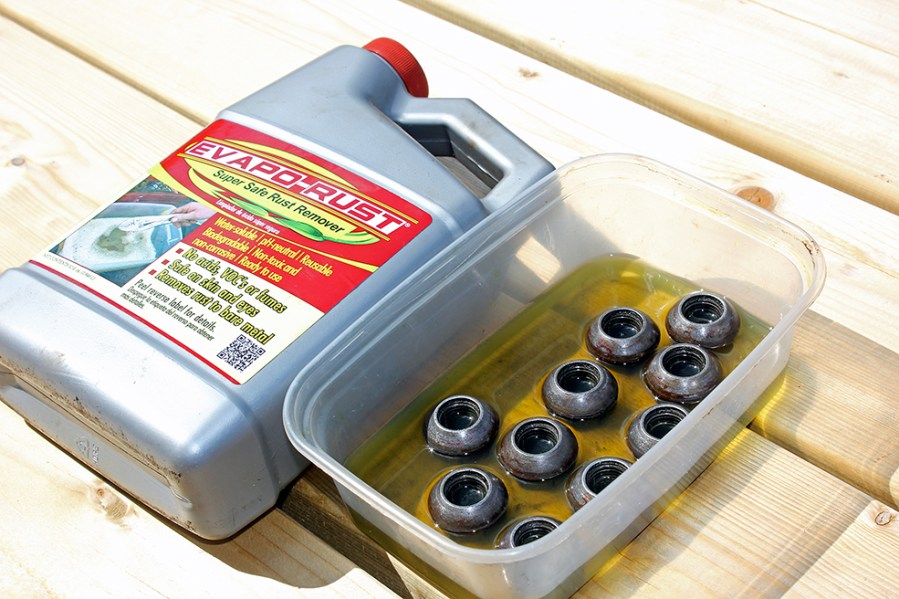
1. There are a number of chemical treatments that can help to remove rust from small components, such as these wheel nuts. This Evapo-Rust treatment is organic and can be reused. First, the wheel nuts are soaked in the solution.
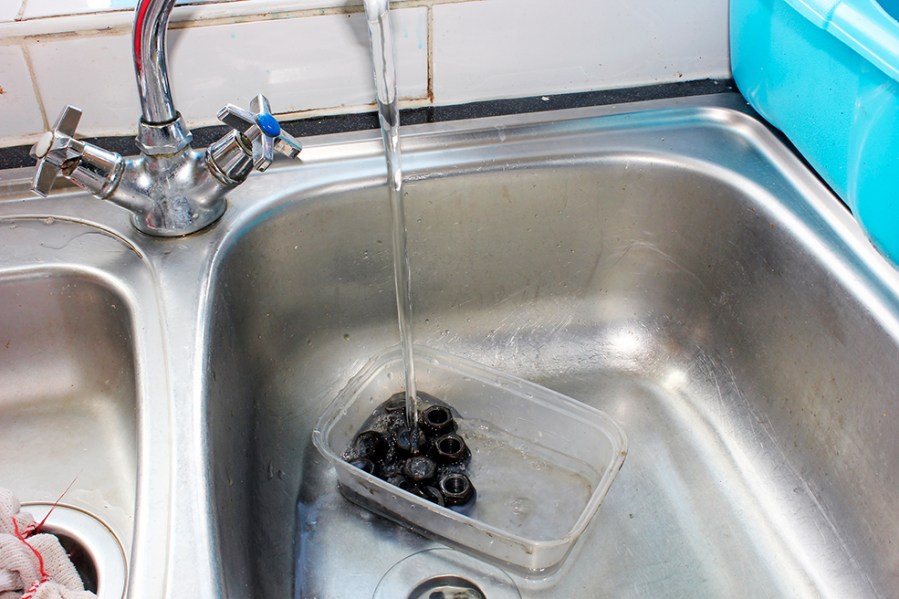
2. After applying a chemical treatment, rinse off all traces of it. This also helps to see if the surface rust has been effectively removed or not – the fittings may need to be soaked in the chemical treatment again.
3. Ensure the fittings are thoroughly dry before applying any paint. If the weather is warm, leave them outside to fully dry. If it’s damp, leave them inside a dry workshop and use a heat gun or hairdryer to dry them.
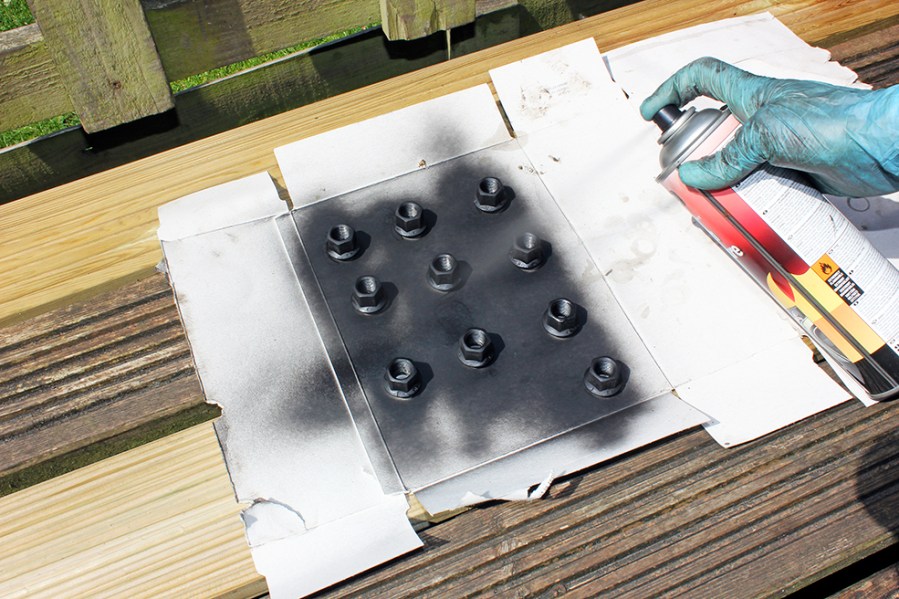
4. Apply the paint in thin coats and allow adequate drying time between each coat. We experimented with applying a high-temperature paint on these wheel nuts, which lasted for a couple of years.
Cosmetic corrosion
There are several aspects of a vehicle where superficial surface corrosion merely looks unsightly and will need years of rusting away to become weakened. The aforementioned wheel nuts and other fittings are one example. Some can be just as quick to fix or avoid, such as brake components, which can be removed and painted. Brake discs can be painted, but only on the surface that doesn’t come into contact with the brake pads. This includes the centre section (as shown in our photograph), which can be painted with a thin paint. It’s feasible to do this on an old brake disc, but there’s less chance of corrosion emerging if the disc is painted when it’s new.
The exterior of a brake drum can also be painted when new or cleaned and painted if old. Backing plates, calipers and caliper carriers can be similarly painted. It’s worthwhile investing in a high-temperature paint or a paint that’s intended for brakes so that the paint can survive hot temperatures and corrosive brake dust.
For more time-consuming rust-prevention jobs, large components including the engine block, cylinder-head, hub assemblies, suspension and rear axle can all be painted to prevent corrosion. This is often best conducted with the parts removed from the vehicle, so don’t be in a rush.
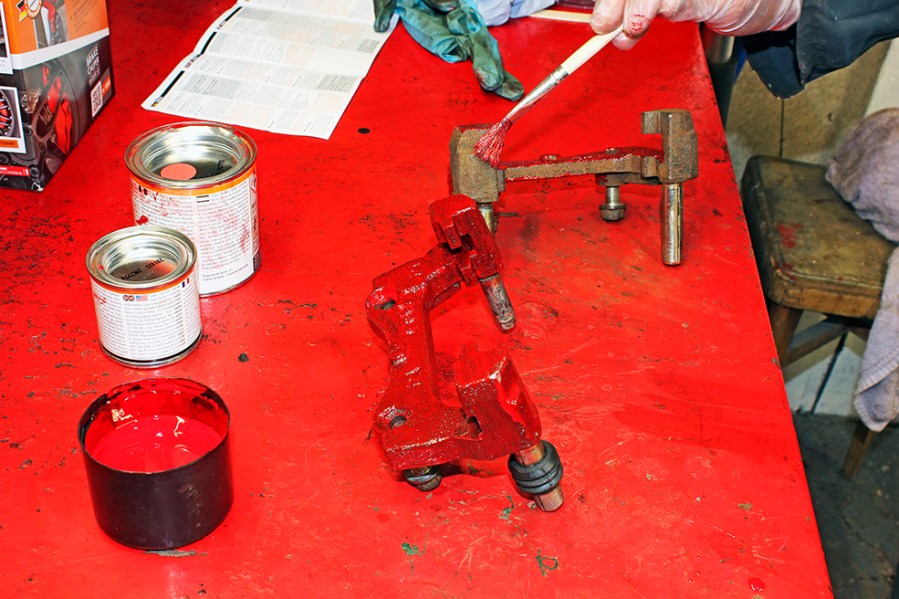
Brake caliper carriers can be removed, scrubbed and painted with a dedicated brake paint or durable metal paint.
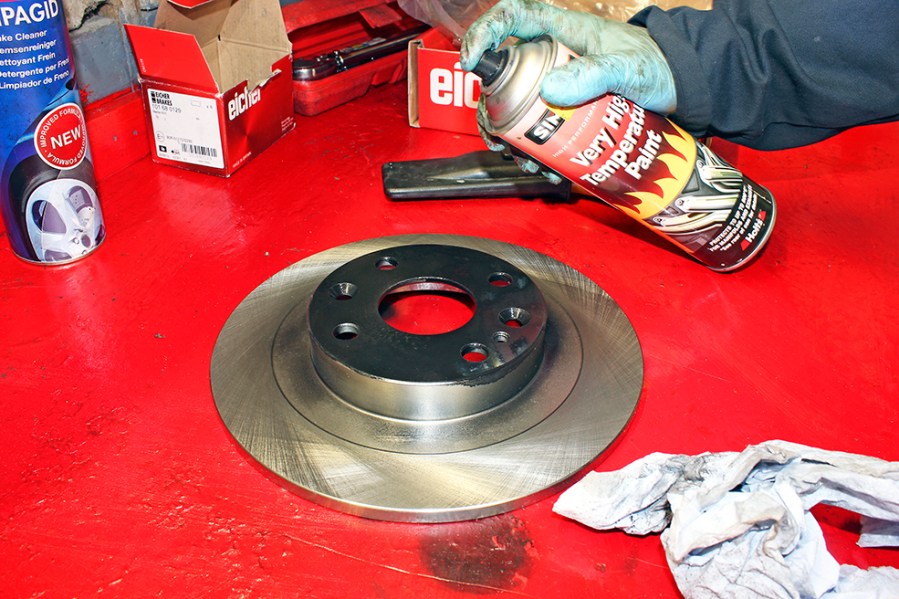
Spray painting the centre section of a new brake disc (the area where the brake pads do not come into contact) can help to protect it from corrosion. A high-temperature paint should withstand the heat generated from the brakes.
Killing surface rust
Surface corrosion on structural and non-structural areas of a vehicle can be treated with a rust inhibitor to help seal off the corrosion and prevent it spreading. This is only suitable where the corrosion is superficial and a thorough clean of the metalwork reveals no structural problems or weakening of the steel. There are numerous rust inhibitor products on the market (eg. Hammerite’s Kurust), which promise to turn the iron oxide into iron tannate and seal off the rust. They all however, recommend cleaning off as much flaky rust as possible before application. The following steps outline what’s involved.
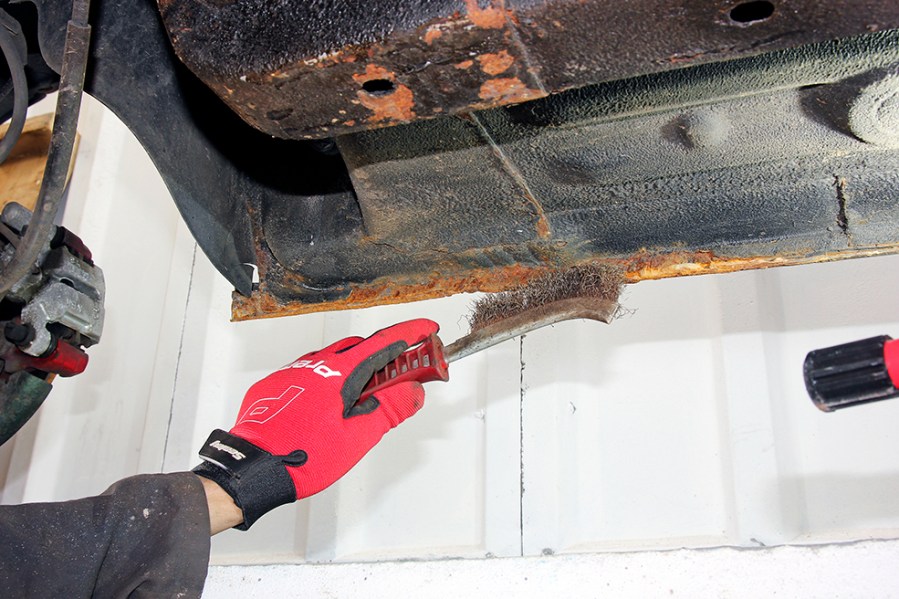
1. A wire brush and scraper can be used to remove as much flaky rust from an area that needs to be treated. Using a wire wheel attached to an electric drill or angle grinder is often quicker, but wear a full-face mask to protect yourself from flying debris.
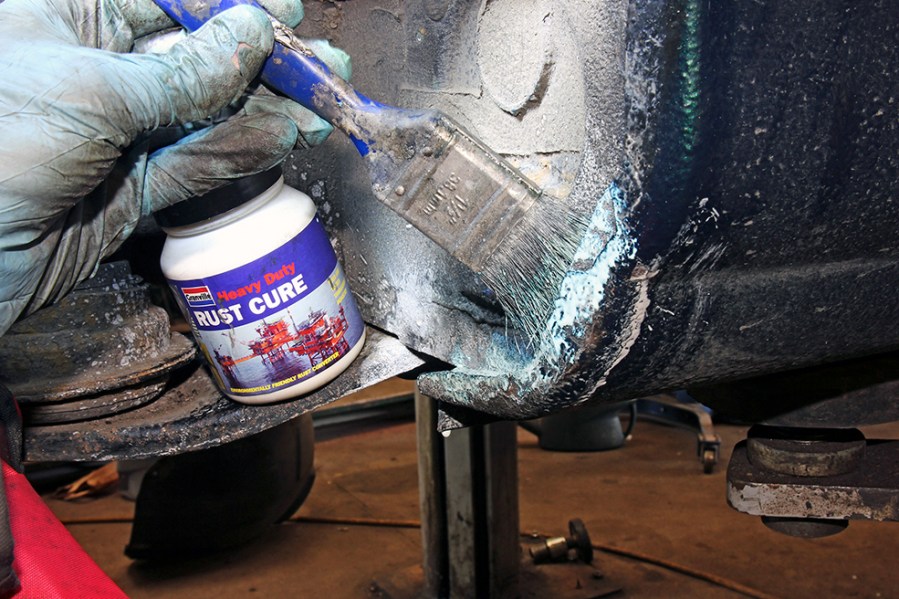
2. Most rust inhibitors can be painted on with a small brush and left to dry. Some require a second coat. The product usually turns black to help indicate there’s a covering of iron tannate.
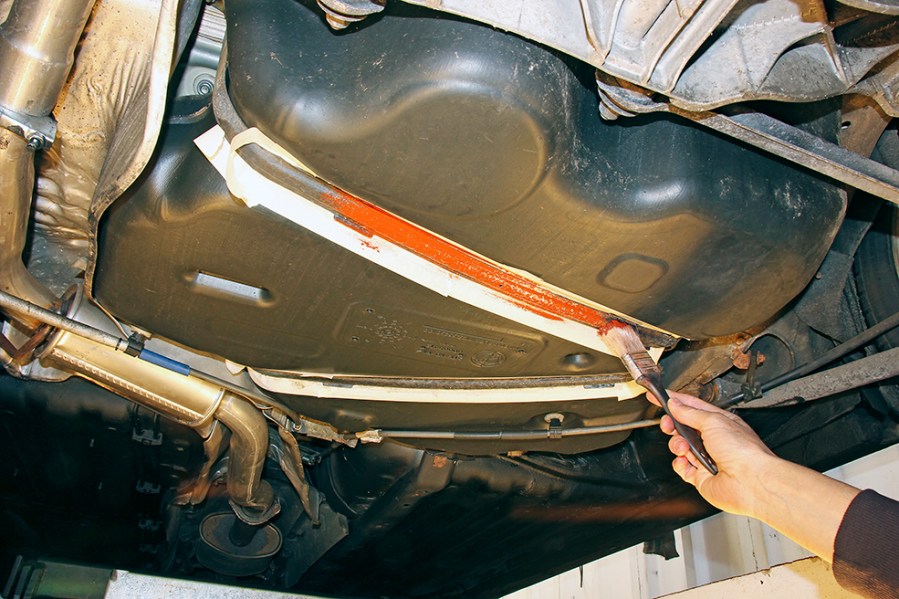
3. Once the rust cure solution has fully dried, apply a coat of metal primer. The surrounding areas may need to be covered, such as these tank straps, where the fuel tank doesn’t need to be painted, so it’s protected with masking tape.
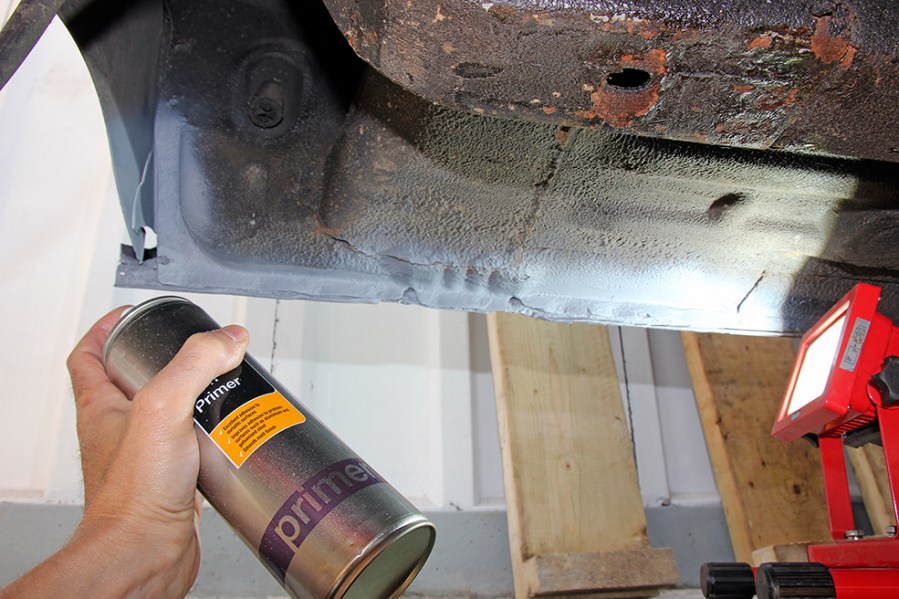
4. Applying a spray primer is another option and can be applied in thin coats to ensure better adhesion. Primer often absorbs moisture, so it needs to be painted over with a topcoat of a suitable metal paint.
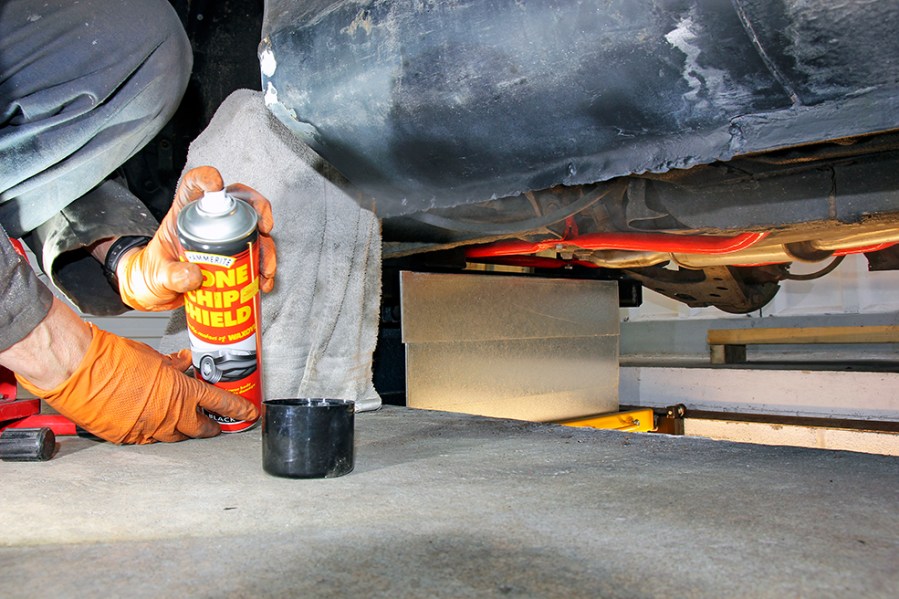
5. For areas where a topcoat of metal paint may become chipped by road dirt, or requires substantial protection, a thick paint may be suitable, or a stonechip paint. This is usually only available in white or black, but can be painted over.
6. For areas underneath the vehicle, the treated and painted rust can be further protected with underseal to ensure road dirt doesn’t chip it back to bare metal and start the corrosion process all over again.
Rustproofing prep
Don’t expect a rustproofing job to be completed in a day. A methodical approach is essential and a sensible estimation of time. Set aside at least a long weekend if you’re intending to do the work yourself, or if you’re commissioning a specialist, be cautious of a quick turnaround time.
The preparation work involved in rustproofing is generally more time-consuming than applying the rustproofing products. Be prepared to get covered in dirt and rustproofing solutions, so invest in overalls, gloves, a breathing mask and goggles. Gather a selection of cleaning tools, such as wire brushes, blunt screwdrivers and scrapers. If you have an angle grinder or variable-speed electric drill (or both), then a wire wheel can save on hours of manual scrubbing, but protect yourself with a full-face mask because the debris that gets flung around with a wire wheel can hurt.
Invest in some panel wipe to help with cleaning surfaces before painting or protecting them.
Use a wire brush to remove any road dirt and loose debris from the underside, including flaky paint and rust. Wipe over it with a panel wipe to ensure the surfaces are clean and ready to be rustproofed.
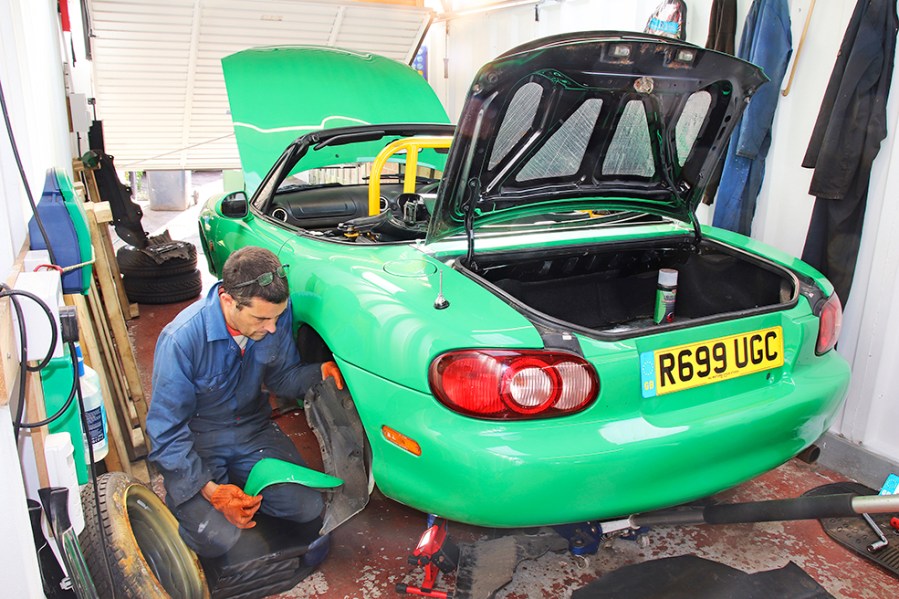
Having an initial plan of action for rustproofing helps to get you started, but be prepared for this to change and grow as you discover more work or problems. A good starting point is to decide what needs to be removed on the vehicle to access the areas that need to be rustproofed, and what needs to be removed to protect it from overspray. Removing wheelarch liners and mudflaps will help to thoroughly rustproof inside the wheelarches, which means the road wheels will need to be removed and the vehicle supported on axle stands. Removing door panels will help to access the insides of the doors, and removing any undertrays will improve access to the chassis legs.
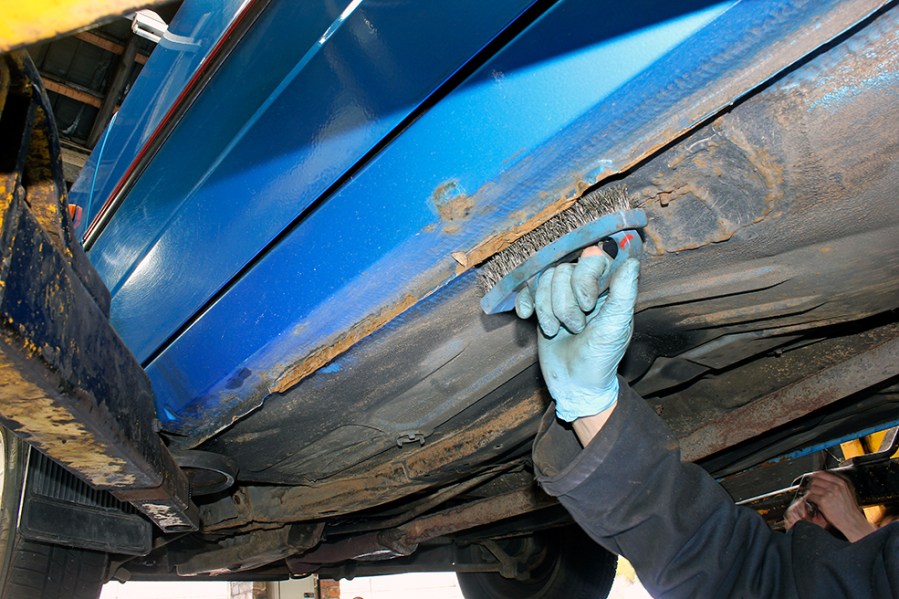
With the vehicle sufficiently stripped, it’s tempting to make a start on applying a rustproofing product, but a better approach is to ensure all dirt, flaky paint and surface corrosion is identified and removed first. Specialists in rustproofing need to complete this stage efficiently, so they may use a hot power washer to clean inside the wheelarches, underneath the floors and inside the sills and chassis legs (providing the drainholes are clear). If you don’t have access to such equipment, then a wire brush can be used instead. As mentioned, using a wire wheel attached to an electric drill or angle grinder will save time (but don’t forget the full-face mask).
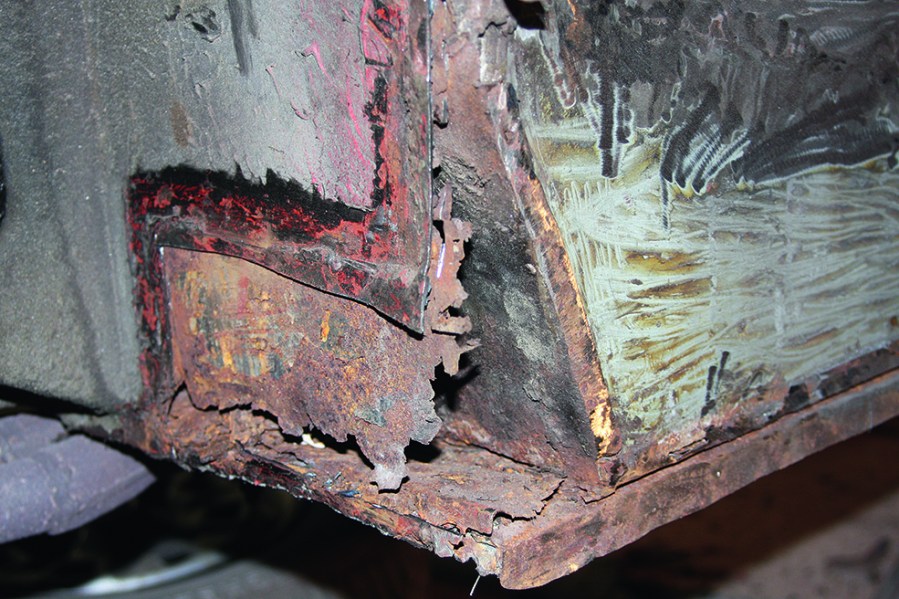
It’s important to not only remove dirt from where you intend to apply a rustproofing solution, but also any old brittle underseal or loose paint. Old underseal should remain flexible and feel slightly soft, but over several years, it will dry out and turn hard. When this happens, moisture can sometimes become trapped between the underseal and the panel it is supposed to be protecting, potentially resulting in corrosion. The best solution to brittle underseal is to scrape it off, which is time-consuming. Using a wire wheel or a wire brush is sometimes quicker, but the bristles may skim over the brittle underseal and fail to lift it off, or any underseal that’s not so hard may clog up the equipment.
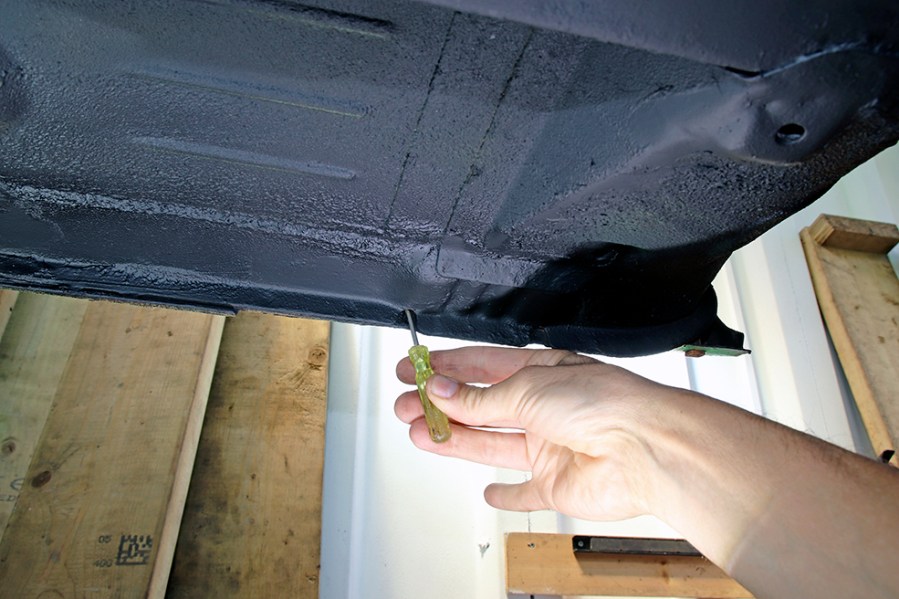
Use a small screwdriver to check any drainholes are clear.
As you clean the areas of the vehicle that will be rustproofed, it’s inevitable that corrosion will be found. Don’t ignore such problems; this is after all the reason why you are rustproofing your vehicle. Try to clean the corroded area with a wire brush or wire wheel to see if non-corroded metal exists behind it. If it doesn’t and the metalwork has weakened, a repair patch or replacement panel may need to be sourced. This advice isn’t always so easy to follow, especially if you realise that a weekend spent rustproofing is probably now going to double in time with cutting out rotten metalwork and welding a patch or replacement panel in position.
Another area of cleaning when preparing a vehicle for rustproofing is the drainholes. These often exist in the doors, sills and chassis legs to ensure water can escape. In some cases, there’s no way of preventing water leaking into these areas, such as the doors, where water will seep inside via the glass, so there must be some means of draining it. Drainholes can be found all over some vehicles, including the sunroof and underneath the fuel filler flap. Pouring hot water through them and poking a thin metal rod inside can help to remove any dirt.
Having a poke around the underside of the sills, chassis legs and floors is essential to ensure the areas you intend to rustproof are structurally sound. It can be a nail-biting experience, but there’s no point rustproofing a chassis leg that’s full of rust.
Removing dirt traps, such as wheelarch liners and mudflaps helps to find the hidden areas where corrosion may be spreading.
Rust treatment
Once all of the rustproofing preparation work has been completed, including removing parts, cleaning, treating surface corrosion and painting exposed metal, it’s time to start applying the rustproofing products.
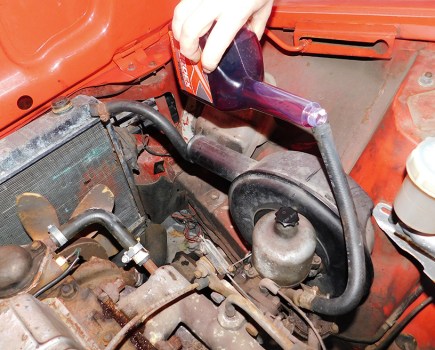
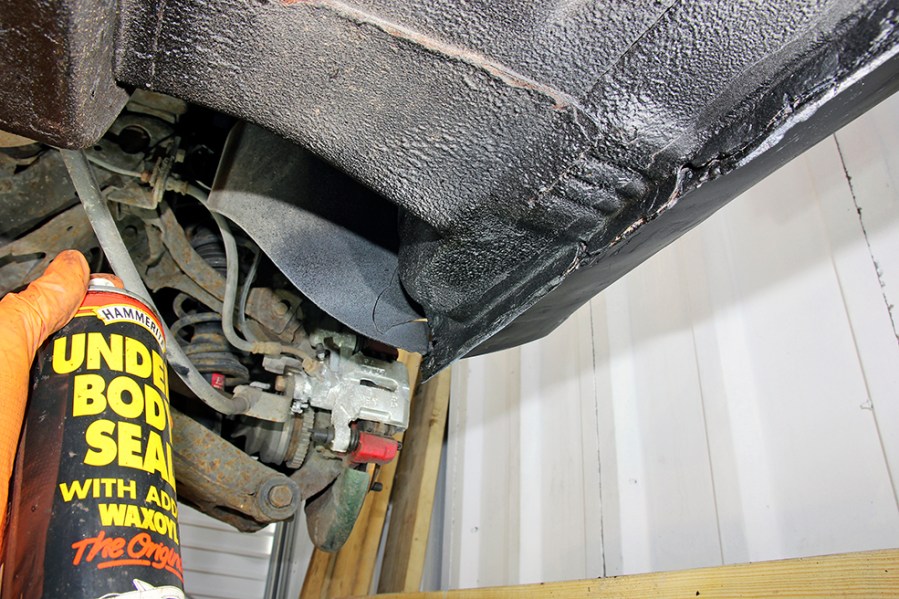
A light wax- and oil-based product is often suitable for hidden areas, such as inside the sills, doors and chassis legs. It needs to be able to lightly coat the walls inside a chassis leg for instance, but avoid blocking any drainholes. So don’t apply too much, but also don’t apply too little. These products are usually effective at repelling moisture and making sure it doesn’t settle, but that moisture may settle on untreated areas, so a thorough coating is essential. Arguably, this is easier said than done, especially inside a chassis leg. Using an aerosol can with a long tube can help to increase the coverage. Some products include a long tube to help. If not, drilling or piercing holes in a tube can sometimes work.
Air-fed equipment is often better at applying an even coating inside a concealed area because it’s more powerful at forcing a rustproofing solution into all the corners and gaps where moisture can collect. If you don’t have an air compressor, then one alternative is a hand pump – Hammerite’s Waxoyl is available in this form. However, aerosol cans are arguably effective at applying rustproofing solution under pressure.
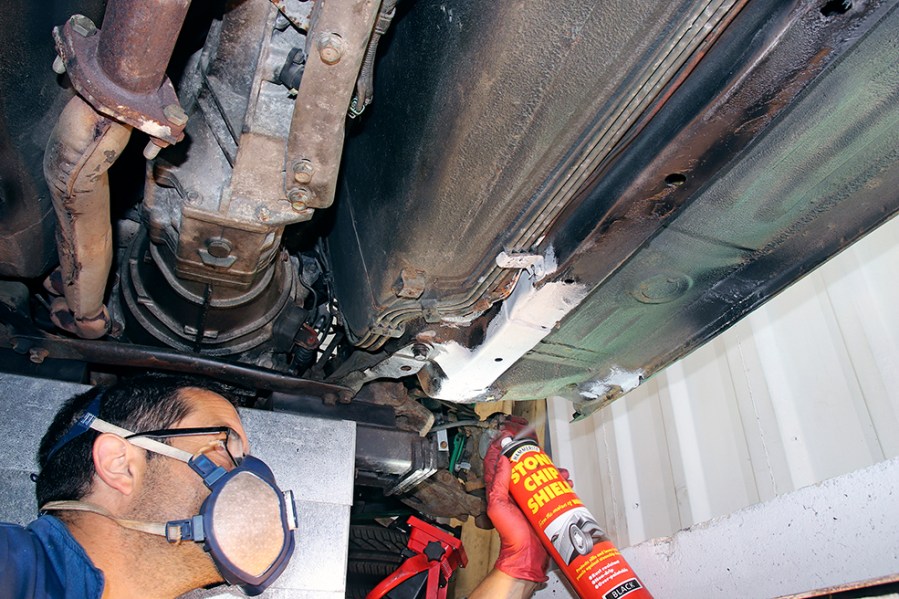
Spraying a light coating of stonechip paint can help to form an undercoat for the underseal and possibly improve its chances of adhesion. This can also help along the lip of the sill for instance, where a light paint can achieve better penetration
If you are rustproofing when the weather is cold, it may help to warm up the products you intend to use to avoid them congealing and blocking any spray equipment. A fan heater or bucket of hot water can help to raise the temperature and keep the liquids free-flowing.
One of the messiest aspects of rustproofing has got to be applying underseal. This black, tar-like substance can be applied using a brush, via an aerosol can or using air-fed equipment and it seems to get everywhere including up your nose and in your hair. It also covers everything it touches, so mask over surrounding paintwork and protect the brakes and the suspension with old rags. Luckily, it can usually be cleaned off with white spirit (or shampoo for your hair), so overspray isn’t the end of the world unless it’s on a panel that doesn’t like white spirit, such as Perspex.
A mixture of brushing and spraying often helps to apply underseal. Spraying helps to force the underseal into cracks and crevices. Avoid applying underseal and other rustproofing products to components that get hot, such as the exhaust system.
For enthusiasts wanting a less messy alternative to traditional black underseal, newer flexible coatings such as Lanoguard offer a clear finish and easier application.
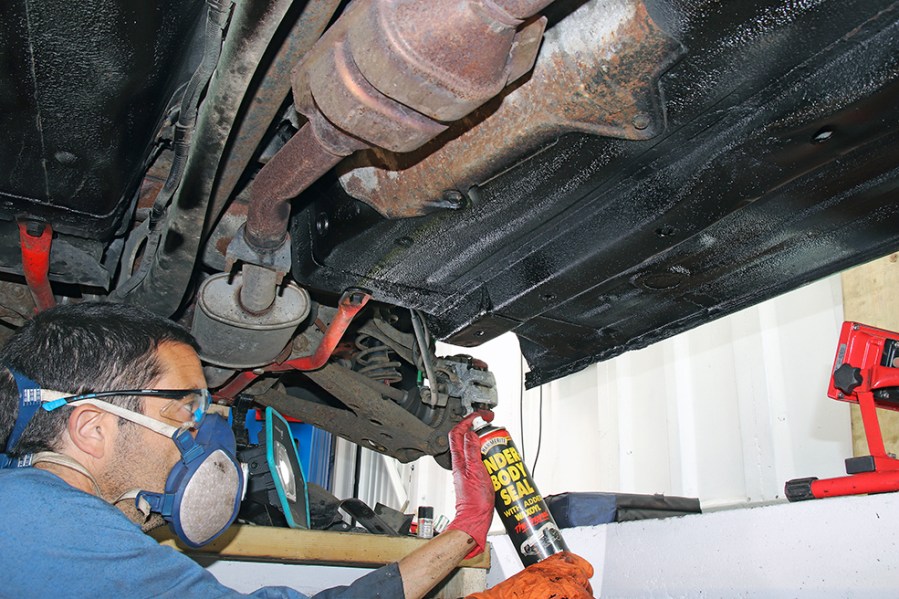
Underseal is available in aerosol cans, tins (for applying with a brush) and in canisters for applying with air-fed spray equipment. Apply two or three light coats, allowing sufficient time to dry in between.
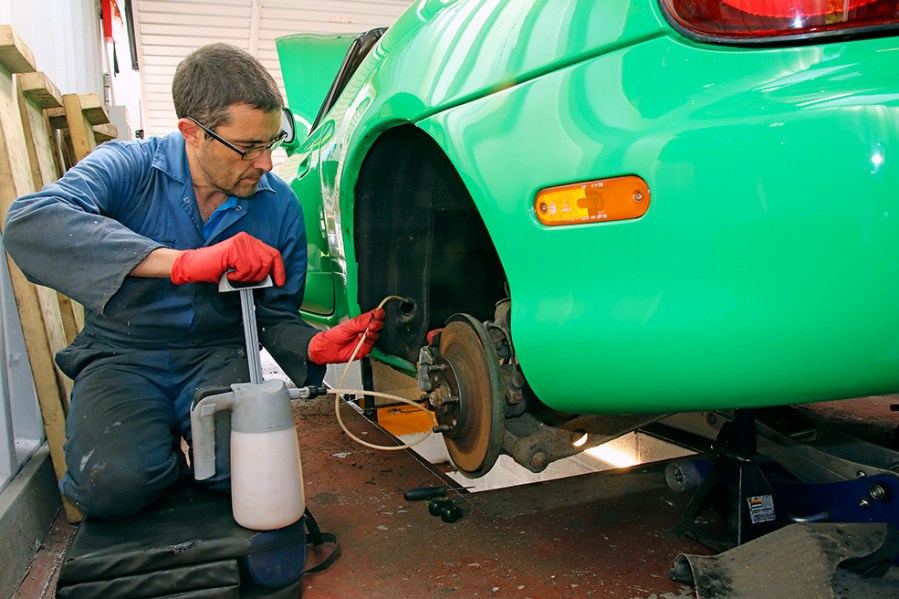
Applying a runny wax-based solution with a pump and long tube helps to spread it deep inside cavities such as sills and chassis legs. This hand pump is from Waxoyl.
Wax alternatives
There are several alternatives to the traditional wax-based products for cavities and underseal for exposed areas. We’ve tested a lanolin-based product called Prolan, which is derived from sheep’s wool. We applied it to a spare wheel well inside a boot area and whilst it smelt of sheep for a few weeks, it appears to have remained effective, although we did thoroughly prepare the area that had suffered from water ingress, cleaning and treating any surface corrosion. Water has returned to the spare wheel well, but not corrosion.
We have also applied a clear rustproofing solution instead of underseal to ensure the paintwork inside a wheelarch is preserved but not hidden. There are several products available, including several wax-based treatments that promise to be just as protective as underseal.
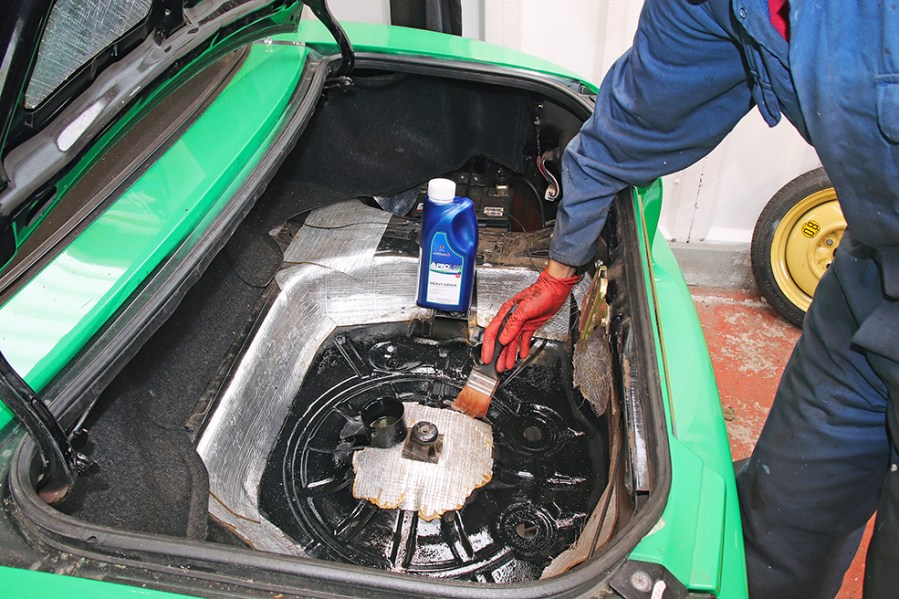
Sheep-derived Prolan was applied to this spare wheel well nearly two years ago. Water occasionally collects in this area, but the rust hasn’t emerged.
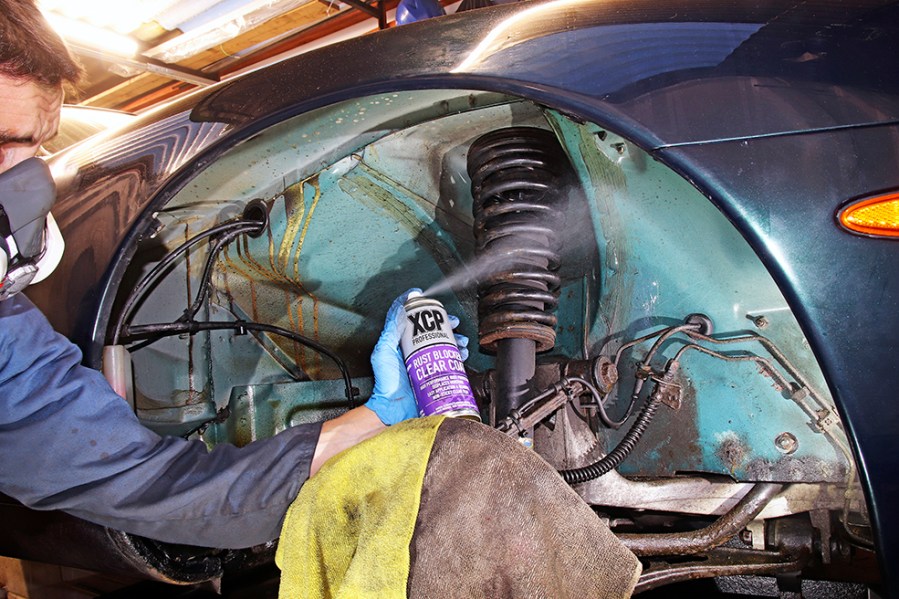
XCP’s Clear Coat can be applied inside this wheelarch to help protect the metalwork and it doesn’t cover over the paint, unlike underseal.
Rustproofing the easier way?
Looking for a simpler, enthusiast-friendly approach? We recently tried a flexible Lanoguard rust protection treatment on a Ford Orion, covering preparation, application and long-term maintenance at home.